Changing an element's class with JavaScript is a powerful technique to achieve this dynamic in creating visually appealing and interactive web pages. With JavaScript's classList interface, developers can effortlessly manipulate classes for seamless updates to the appearance and behavior of web elements.
By changing an element's class in JavaScript, we can apply different CSS styles to the element based on user interactions or certain conditions to create visually appealing and interactive web pages that respond to user actions, such as hovering over an element or clicking a button.
Also, CSS transitions and animations can be triggered by adding or removing classes to create smooth and engaging animations that respond to user actions.
Moreover, Class js changes are often linked to event handling. When users interact with elements like buttons or links, we can use JavaScript to modify the class of the element to update its appearance or behavior accordingly.
In this blog, we will explore the various methods provided by the classList interface:
- Prerequisites to Change an Element’s Class with JavaScript
- Setting the Element with JavaScript
- Changing Element’s Class with JavaScript
Prerequisites to Change an Element’s Class with JavaScript:
- DOM (Document Object Model) Manipulation: DOM is a programming interface that represents the HTML structure of a web page as a tree-like structure of objects. You need to know how to access and interact with DOM elements using JavaScript methods like
getElementById,querySelector, andgetElementsByClassName. - JavaScript Fundamentals: Before working with class JS manipulation, you should have a solid grasp of JavaScript fundamentals, including variables, data types, functions, loops, and conditionals.
- Event Handling: If you want to change an element's class based on user interactions, such as a click or mouseover event, you should be familiar with event handling in JavaScript. Understanding how to attach event listeners and respond to events is essential.
- classList Property: To change an element's class JS, you'll need to use the
classListproperty, which is part of the DOM API. Familiarize yourself with the methods provided byclassList, such asadd(),remove(), andtoggle().
Set the Element's Class with JavaScript
Setting elements with class in JavaScript is an easier technique that lets developers interact with HTML elements in an interesting way. JavaScript provides a bunch of methods to do this, all aimed at targeting specific elements in the Document Object Model (DOM), which is just a structured representation of an HTML document.
So, when you select elements, you can change content, modify styles, and even update attributes. Think about form validation, event handling, generating dynamic content, and getting real-time updates – all of these become possible with element selection.
- getElementById
- getElementsByClassName
- getElementsByTagName
- querySelector
- querySelectorAll
- getElementByName
- querySelector in Context
- Parent/Child/Descendant Selectors
Here we will look into two following div and button tag in the HTML. We will add each Setting methods for the same HTML.
Let's provide an explanation of different methods to select elements using JavaScript:
<body>
    <div id="myDiv" class="box">This is a DIV element</div>
    <button id="changeColorButton">Change Color</button>
    <script>
        // Get the button and the element to be manipulated
        // Add the following setting element example code here
    </script>
</body>
1. getElementById
- The
getElementByIdmethod allows you to retrieve a single element from the DOM by providing its uniqueidattribute. - Usage:
document.getElementById('elementId'); - Example:
// Example to set element by ID
const changeColorButton = document.getElementById('changeColorButton');
const myDiv = document.getElementById('myDiv');
2. getElementsByClassName
- The
getElementsByClassNamemethod sets multiple elements that share a common class name. - Usage:
document.getElementsByClassName('className'); - Example: If you wish to set elements with the class "myClass", you can utilize:
// Example to set element by class name
const changeColorButton = document.getElementsByClassName('changeColorButton');const myDiv = document.getElementsByClassName('myDiv');
3. getElementsByTagName
- By using the
getElementsByTagNamemethod, you can retrieve all elements of a particular HTML tag name. - Usage:
document.getElementsByTagName('tagName'); - Example: To set all
<p>elements on a page, you can employ:
// Example to set element by tag name
const changeColorButton = document.getElementsByTagName('button');
const myDiv = document.getElementsByTagName('div');
4. querySelector
- The
querySelectormethod allows you to set the first element that matches a specified CSS selector. - Usage:
document.querySelector('selector'); - Example: To select the first
<div>element on the page, you can use:
// Example to set query selector
const changeColorButton = document.querySelector('button');
const myDiv = document.querySelector('div');
5. querySelectorAll
- With
querySelectorAll, you can retrieve all elements that match a given CSS selector, and they are returned as a NodeList, which is similar to an array. - Usage:
document.querySelectorAll('selector'); - Example: To gather all
<a>elements on a page, you can use:
// Example to set query selector all
const changeColorButton = document.querySelectorAll('button');
const myDiv = document.querySelectorAll('div');
6. getElementByName
- The
getElementsByNamemethod allows you to set elements by their name attribute and returns a collection of elements that match the specified name. - Usage:
getElementsByName('username') - Example: To return a collection containing all elements with the
nameattribute equal to'username.'The returned collection is an HTMLCollection, similar to an array, and it can be iterated over to access each matching element.
<input type="text" name="username" />
<input type="text" name="email" />
<input type="text" name="phone" />
// Example to set element by name
const elements = document.getElementsByName("username");7. querySelector in Context
- The
querySelectormethod, when used on a specific element, enables you to set elements within the scope of that element, rather than the entire document. - Usage:
element.querySelector('selector'); - Example: To search for an element with the class "nestedClass" within a container element with the ID "myContainer", you can use:
<div id="myDiv" class="box">
  <button id="changeColorButton">Change Color</button>
</div>
// Example to select query selector in context
const myDiv = document.querySelector('div');
const changeColorButton = myDiv.querySelector('button');8. Parent/Child/Descendant Selectors
Usage: You can set elements based on their relationship to other elements, such as parent, child, or descendant relationships into specific CSS selectors within querySelector or querySelectorAll,
Examples:
- To set all elements with the class "childClass" that are children of a
parentElement, you can use:
const childElements = parentElement.querySelectorAll('.childClass');- To set all elements with the class "descendantClass" that are descendants of an
ancestorElement, you can use:
const descendantElements = ancestorElement.querySelectorAll('.descendantClass');Changing Element’s Class with JavaScript
Changing an element's classes with JavaScript is a common technique used to dynamically update the appearance and behavior of elements on a web page.
JavaScript provides the classList interface, which offers several methods for add, remove, toggle, and replace classes on elements.
These methods allow developers to modify the class attribute of an element, making it easy to apply CSS styles or trigger specific behaviors associated with those classes.
Let's explore the methods provided by the classList interface for changing element classes:
#1 Add Element’s Class - classList.add(className)
The classList.add(className) method is a part of the classList interface in JavaScript, and it is used to add one or more CSS classes to the list of classes of the selected element.
The classList.add method will not add a class if it already exists in the class list. It only checks if there are no duplicate class names.
Syntax:
element.classList.add(className1, className2, ..., classNameN);
Parameters:
className1, className2, ..., classNameN: One or more strings representing the names of the classes to be added. Separate multiple class names by commas.
Usage:
a. Adding a Single Class:
<div id="box" class="box-style">This is a box.</div>
const box = document.getElementById("box");
box.classList.add("new-box-style");
The classList.add method adds the class "new-box-style" to the element with the ID "box." After executing this code, the element will have both "box-style" and "new-box-style" classes.
b. Adding Multiple Classes:
<div id="box" class="box-style">This is a box.</div>
const box = document.getElementById("box");
box.classList.add("class1", "class2", "class3");
In this case, we are adding multiple classes ("class1", "class2", and "class3") to the element with the ID "box."
c. Adding Classes Conditionally:
<div id="box" class="box-style">This is a box.</div>
<button onclick="toggleStyle()">Toggle Style</button>
const box = document.getElementById("box");

function toggleStyle() {
  if (box.classList.contains("new-style")) {
    box.classList.remove("new-style");
  } else {
    box.classList.add("new-style");
  }
}
The button with an onclick event that calls the toggleStyle function, checks if the element with the ID "box" has the class "new-style." If it does, the class is removed using classList.remove. If the class is not present, it is added using classList.add.
#2 Remove Element’s Class - classList.remove(className)
The classList.remove(className) is used to remove one or more CSS classes from the list of classes of the selected element. This method provides a straightforward way to dynamically modify the class attribute of an element and, consequently, remove CSS styles or behavior associated with those classes.
The classList.remove method will not produce an error if you try to remove a class that does not exist in the class list. It simply ignores the class name if it is not found in the list.
Syntax:
element.classList.remove(className1, className2, ..., classNameN);Parameters:
className1, className2, ..., classNameN: One or more strings representing the names of the classes to be removed. Separate multiple class names by commas.
Usage:
a. Remove a Single Class:
<div id="box" class="box-style">This is a box.</div>
const box = document.getElementById("box");
box.classList.remove("box-style");
The classList.remove method removes the class "box-style" from the element with the ID "box." After executing this code, the element will no longer have the "box-style" class, and any associated CSS styles with that class will be removed.
b. Remove Multiple Classes:
Here is an example on how to remove multiple classes ("class1" and "class2") from the element with the ID "box."
<div id="box" class="class1 class2 class3">This is a box.</div>
const box = document.getElementById("box");
box.classList.remove("class1", "class2");
c. Remove Classes Conditionally:
<div id="box" class="box-style new-style">This is a box.</div>
<button onclick="toggleStyle()">Toggle Style</button>
const box = document.getElementById("box");

function toggleStyle() {
  if (box.classList.contains("new-style")) {
    box.classList.remove("new-style");
  } else {
    box.classList.add("new-style");
  }
}
The button with an onclick event that calls the toggleStyle function that now checks if the element with the ID "box" has the class "new-style." If it does, the class is removed using classList.remove. If the class is not present, it is added using classList.add.
#3 Toggle Element’s Class - classList.toggle(className)
The classList.toggle(className) method is part of the classList interface in JavaScript, and it is used to toggle the presence of a CSS class in the list of classes of the selected element. This method provides a convenient way to simultaneously add or remove a class based on its current state.
The classList.toggle method is particularly useful when you want to create elements that can be toggled on and off with a single function call, such as showing/hiding dropdowns or changing the appearance of an element based on user interactions.
When using classList.toggle without the force parameter, it automatically determines whether to add or remove the class based on its current presence. If the class exists, it will be removed; if it does not exist, it will be added.
Syntax:
element.classList.toggle(className, force);
Parameters:
className: The string representing the name of the class to be toggled.force(optional): A Boolean value. Iftrue, the class is added; iffalse, the class is removed. If this parameter is not provided, the method will automatically toggle the class, meaning it will be added if it's not present and removed if it's already present.
Usage:
a. Toggling a Single Class:
<div id="box" class="box-style">This is a box.</div>
const box = document.getElementById("box");
box.addEventListener("click", function() {
  box.classList.toggle("highlight");
});
When the element is clicked, the toggle method is called on the classList, and it toggles the presence of the class "highlight." If the "highlight" class is not present, it will be added, and if it is already present, it will be removed.
b. Toggling a Class Conditionally:
<div id="box" class="box-style new-style">This is a box.</div>
<button onclick="toggleStyle()">Toggle Style</button>
const box = document.getElementById("box");

function toggleStyle() {
  box.classList.toggle("new-style");
}
When the button is clicked, the function simply calls the toggle method on the classList, which toggles the presence of the class "new-style" on the element with the ID "box."
c. Forcing a Class to Be Added or Removed:
<div id="box" class="box-style">This is a box.</div>
<button onclick="forceClass()">Force Class</button>
const box = document.getElementById("box");

function forceClass() {
  box.classList.toggle("new-style", true); // Force add "new-style" class
  // box.classList.toggle("new-style", false); // Force remove "new-style" class
}
When the button is clicked, the function calls the toggle method on the classList with the force parameter set to true, forcing the "new-style" class to be added to the element. If we switch the comments and use false instead, the class would be removed.
#4 Replace Element’s Class - classList.replace(className)
The classList.replace(oldClass, newClass) method is used to replace one CSS class with another in the list of classes of the selected element. This method provides an easy way to dynamically modify the class attribute of an element, effectively updating its appearance or behavior by swapping one class for another.
The classList.replace method is useful when you want to switch or update the styles of an element dynamically based on certain conditions or user interactions.
If the oldClass specified in classList.replace is not found in the class list, the method behaves like classList.add and simply adds the newClass. If the oldClass is present multiple times in the class list, only the first occurrence will be replaced. The method does not replace all instances of the oldClass.
Syntax:
element.classList.replace(oldClass, newClass);
Parameters:
oldClass: The string representing the name of the class to be replaced.newClass: The string representing the name of the class that will replace the old class.
Usage:
a. Replacing a Single Class:
<div id="box" class="box-style old-class">This is a box.</div>
const box = document.getElementById("box");
box.classList.replace("old-class", "new-class");
The classList.replace method replaces the class "old-class" with the class "new-class" in the element with the ID "box." After executing this code, the element will have the classes "box-style" and "new-class," and the "old-class" will be replaced.
b. Replacing a Class Conditionally:
<div id="box" class="box-style new-style">This is a box.</div>
<button onclick="replaceClass()">Replace Class</button>
const box = document.getElementById("box");

function replaceClass() {
  if (box.classList.contains("new-style")) {
    box.classList.replace("new-style", "highlight");
  } else {
    box.classList.replace("highlight", "new-style");
  }
}
This function checks if the element with the ID "box" has the class "new-style." If it does, the class is replaced with "highlight" using classList.replace. If the class "new-style" is not present, it is replaced with "highlight."
#5 Contains Element’s Class - classList.contains(className)
The classList.contains(className) method is used to check if a specific CSS class exists in the list of classes of the selected element. This method allows you to verify whether an element has a particular class applied to it, helping you make decisions or perform actions based on the presence or absence of that class.
The classList.contains method is especially useful when you want to perform conditional actions based on the existence of a particular class on an element.
It helps you simplify code logic by checking for the presence of a class before applying further operations or styles. The method works with any number of classes in the class list, and it is case-sensitive. So, make sure to provide the class name exactly as it appears in the class attribute of the element.
Syntax:
element.classList.contains(className);
Parameters:
className: The string representing the name of the class to be checked for.
Return Value:
- The method returns a Boolean value (
trueorfalse): true: If the specifiedclassNameis found in the class list of the element.false: If the specifiedclassNameis not found in the class list.
Usage:
a. Checking for a Single Class:
<div id="box" class="box-style">This is a box.</div>
const box = document.getElementById("box");
const hasBoxStyle = box.classList.contains("box-style");
console.log(hasBoxStyle); // Output: true
The classList.contains method checks whether the class "box-style" exists in the element with the ID "box." Since the class is present, the method returns true, and the variable hasBoxStyle will be set to true.
b. Checking for a Class Conditionally:
<div id="box" class="box-style">This is a box.</div>
<button onclick="checkClass()">Check Class</button>
const box = document.getElementById("box");

function checkClass() {
  if (box.classList.contains("box-style")) {
    console.log("The class 'box-style' is present.");
  } else {
    console.log("The class 'box-style' is not present.");
  }
}
This function checks if the element with the ID "box" has the class "box-style" using classList.contains. If the class is present, it logs "The class 'box-style' is present." Otherwise, it logs "The class 'box-style' is not present."
Conclusion:
JavaScript, with its classList interface, gives upon us a versatile toolkit to add, remove, toggle, and replace classes with ease. class changes lies in their ability to alter CSS styles, manage states, and create interactivity on the fly.
From form validation and responsive web design to event handling and conditional rendering, class manipulation empowers us to adapt our web pages to the diverse needs and interactions of users.
changing an element's class with JavaScript capabilities of class manipulation has revealed itself as a fundamental building block for object-oriented programming in the language.
With the introduction of ECMAScript 6 (ES6), JavaScript classes offer a more structured and intuitive approach to creating and extending objects, facilitating code reusability and maintainability.
ReplayBird - Analyze and Track Every Unprecedented JavaScript Errors
ReplayBird's Error Analysis automatically captures and logs client-side errors, including detailed information such as stack traces, user data, and environmental context to pinpoint the JavaScript errors.
Monitor errors in real-time, receive timely notifications whenever issues arise to proactively address problems, reducing downtime and improving overall application stability.
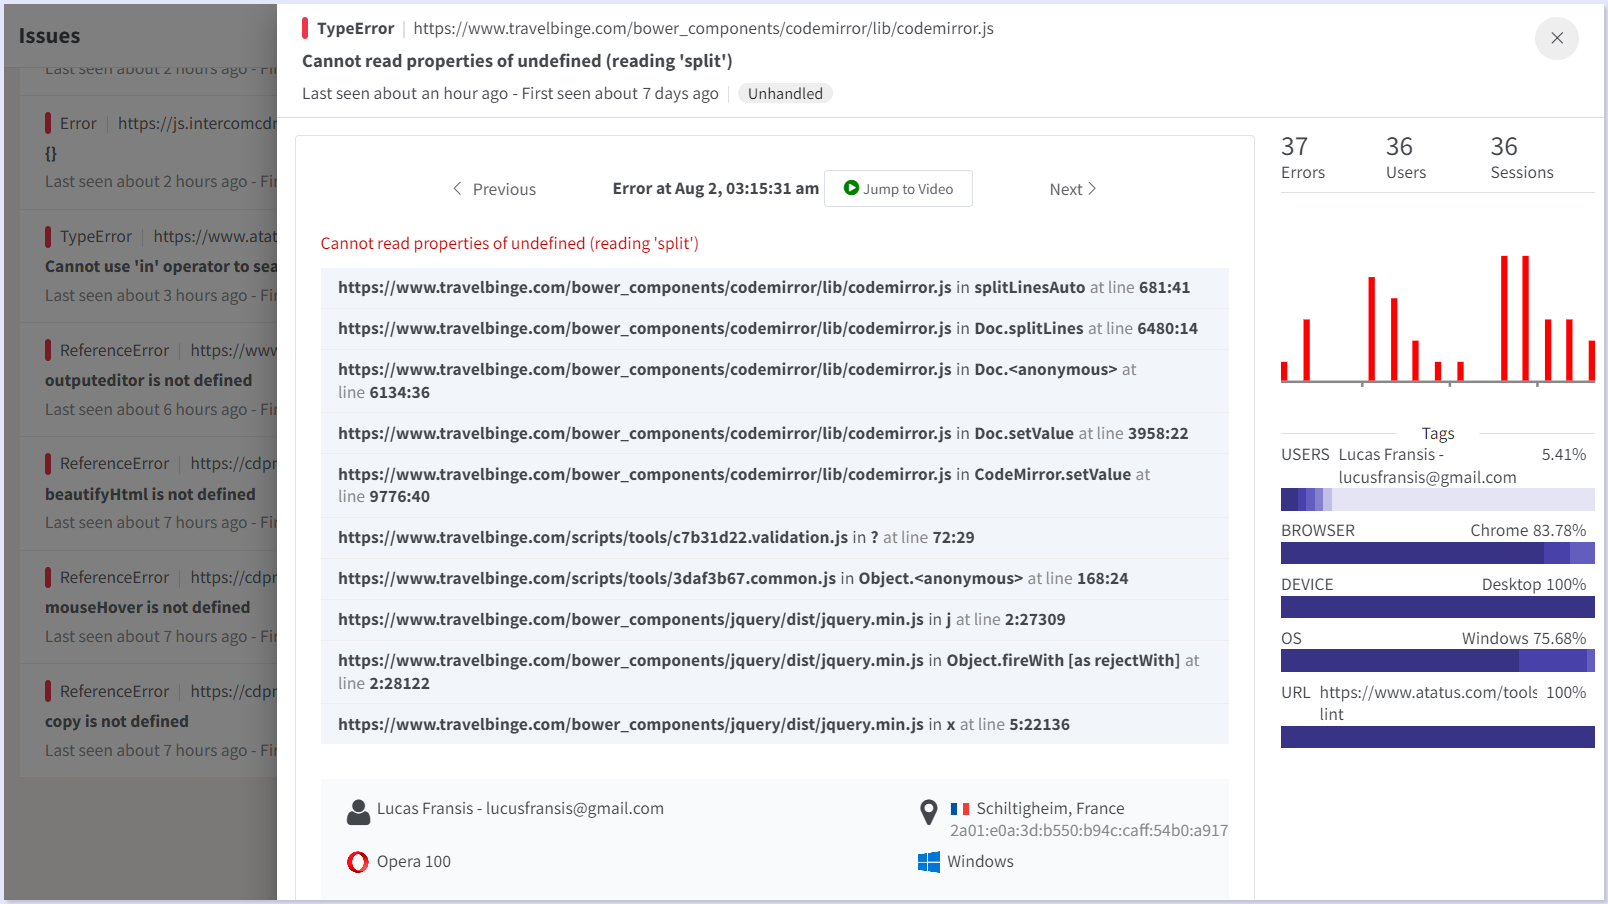
With session replay, you can view and analyze user interactions and screen activity leading up to an error. Replay entire user sessions step-by-step to gain insights into the user's journey and identify the exact sequence of events that triggered the error.
Recreate and debug JavaScript errors instantly and effectively, leading to faster resolution and improved user satisfaction.
Try ReplayBird 14-days free trial
Keep Reading more About JavaScript
 Velantina
 Velantina
 Velantina