Let's say you are working on multiple projects with varying dependencies or your projects have specific compatibility requirements. Managing different Node.js versions has become frequent. App1 and App2, each requiring different Node.js versions, v10 and v12, respectively.
Initially, NVM is installed by following instructions from the official repository. Subsequently, the necessary Node.js versions are installed using NVM commands.
For App1, developers navigate to its directory and set the Node.js version to v10 with nvm use v10. After running App1, the focus shifts to App2, and the node version is switched to v12 by executing nvm use v12 in its directory.
With the NVM command nvm use <version>, you can change your Node.js version for any application anytime you want, as many times as you want to change your node version.
This easiest shift of node versions facilitates smooth execution, and NVM's ability to switch node versions on a per-project basis is pivotal in addressing compatibility issues and ensuring seamless development across diverse projects with distinct version requirements. This approach offers flexibility and ease in handling the complexities associated with diverse project environments.
Table of Content:
- What is Node Version Manager (NVM)
- Why Node.js developers need Node Version Manager?
- Steps to Change Node.js Version
What is NVM (Node Version Manager) ?
Node Version Manager (NVM) is a command-line tool designed for managing multiple Node.js versions on a single system. It let node.js developers easily switch between different node versions for their projects for better compatibility and flexibility.
With NVM, users can install, uninstall, and switch between Node.js versions with a simple command, providing a seamless way to adapt to varying project requirements.
This capability is particularly useful for developers working on projects that may rely on different Node.js versions, dependencies, or specific language features. NVM simplifies the management of Node.js environments.
Why Node.js developers need Node Version Manager?
Every Node.js developer needs Node Version Manager (NVM) as it provides a great and easier solution to manage and switch node versions seamlessly. You can install multiple Node.js versions on your machines and easily switch between them based on the requirements of specific projects.
- Project-specific Versioning: Different projects often have specific dependencies and requirements which is compatible with certain Node.js versions. By using NVM to set project-specific Node.js versions, you can ensure that each of your node project runs on the appropriate version, without conflicts and with a consistent development environment.
- Compatibility Testing: As we all know all applications need to be tested across different Node.js versions to make sure they work seamlessly in various environments, NVM simplifies this process by making the changing node versions effortlessly, for improved compatibility testing and debugging.
- LTS Stability and Security: Long-Term Support (LTS) versions of Node.js provide stability and security updates over an extended period, with projects benefit from ongoing support, bug fixes, and security patches.
- Avoiding System-level Installs: Installing Node.js globally on a system will require administrative permissions and can lead to potential permission issues. NVM manages Node.js versions without system-level installs, providing extensive control and an isolated development environment.
- Global Package Isolation: When working with different node.js versions, global npm packages can lead to conflicts, which is why NVM isolates global npm packages for each node.js version, letting packages installed globally are specific to the active version.
- Easier Updates and Rollbacks: Node.js updates may introduce new features or bug fixes, but they can also lead to compatibility issues with existing projects. NVM simplifies the process of updating or rolling back Node.js versions to adapt to changes or revert to a previous version if needed, maintaining flexibility and control over the development environment.
Steps to Change Node.js Version
Changing the Node.js version can be done using Node Version Manager (NVM) with just 4 steps, but you already looking for an installed node application, you can skip to the 4th step directly. Here are the steps to change the Node.js version:
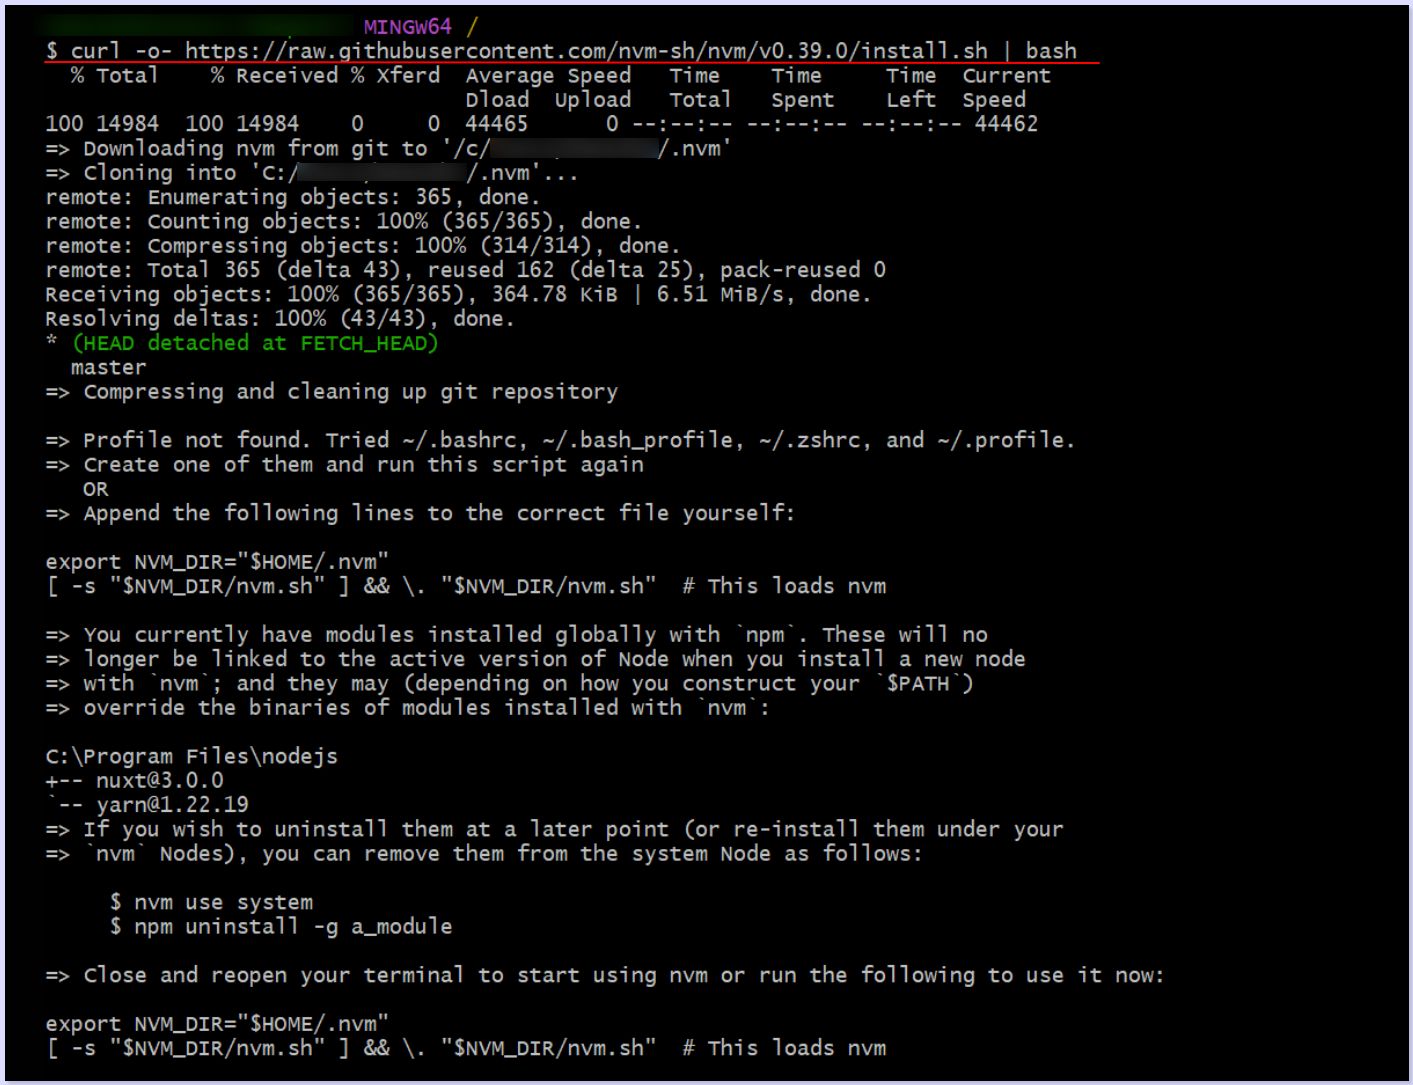
Step 1: Install NVM (Node Version Manager)
Open your terminal, which is the command-line interface on your computer. You can typically find it by searching for "Terminal" or "Command Prompt" in your operating system.
a) Using curl:
curl -o- https://raw.githubusercontent.com/nvm-sh/nvm/v0.39.7/install.sh | bashThis command downloads the installation script for nvm from the specified URL and pipes it directly to the bash shell for execution. The script installs nvm on your system.
Output:
Alternatively, using wget:
wget -qO- https://raw.githubusercontent.com/nvm-sh/nvm/v0.39.7/install.sh | bashIf you prefer using wget instead of curl, this command achieves the same result. wget is another command-line tool for downloading files.
b) Restart Terminal or Source Configuration
After running the installation command, you need to either restart your terminal or reload the configuration files. This step is necessary to make the changes take effect.
c) Restart Terminal/Source Configuration:
Simply close the terminal window and open a new one, or if you don't want to restart the terminal, you can run the following command to source (load) the configuration files:
For Bash users:
source ~/.bashrc
For Zsh users:
source ~/.zshrc
This command reloads the configuration files (.bashrc or .zshrc) which contain environment settings to which the changes made by nvm during installation are applied.
Once you've completed these steps, you should have nvm installed on your system, and you can use it to manage different versions of Node.js.
Make sure you have curl or wget installed on your system. Most Unix-like systems come with one of these tools pre-installed.
The version number in the URLs (v0.39.0) may change over time as new versions of nvm are released. You can check the official nvm repository on GitHub for the latest version. Update the URL accordingly if there's a newer version available.
Step 2: Install Node.js using NVM
Once you have nvm (Node Version Manager) installed, you can use it to install a specific version of Node.js. Open your terminal and run the following command:
nvm install <latest_version>
Replace <latest_version> with the version number you want to install. For example:
nvm install 14.17.5
This command downloads and installs the specified version of Node.js on your system.
Use the Installed Version
To use the version of Node.js that you just installed, run the following command:
nvm use <version>
Replace <version> with the specific version number. For example:
nvm use 14.17.5
This command sets the currently active version of Node.js for the current shell session. If you open a new terminal window, you'll need to run nvm use <version> again to set the version for that session.
Step 3: Managing different Node.js versions
Let us look how to manage multiple Node.js versions and change node versions.
a) Set a Default Node.js Version
If you want to set a default Node.js version for future shell sessions, you can use the following command:
nvm alias default <version>
For example:
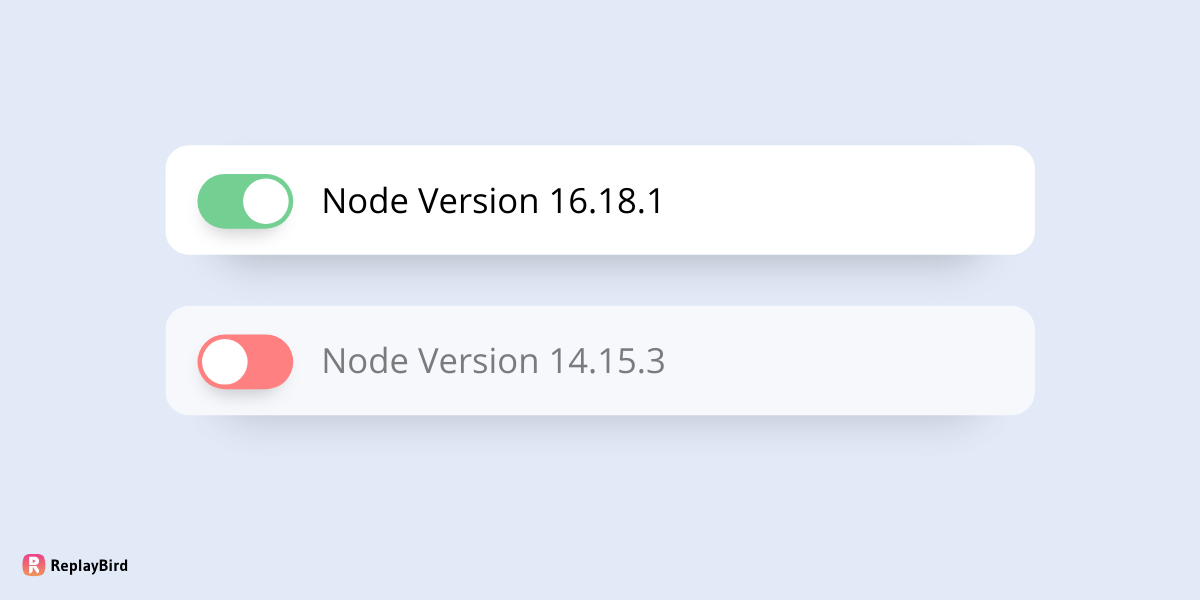
nvm alias default 14.15.3
Output:
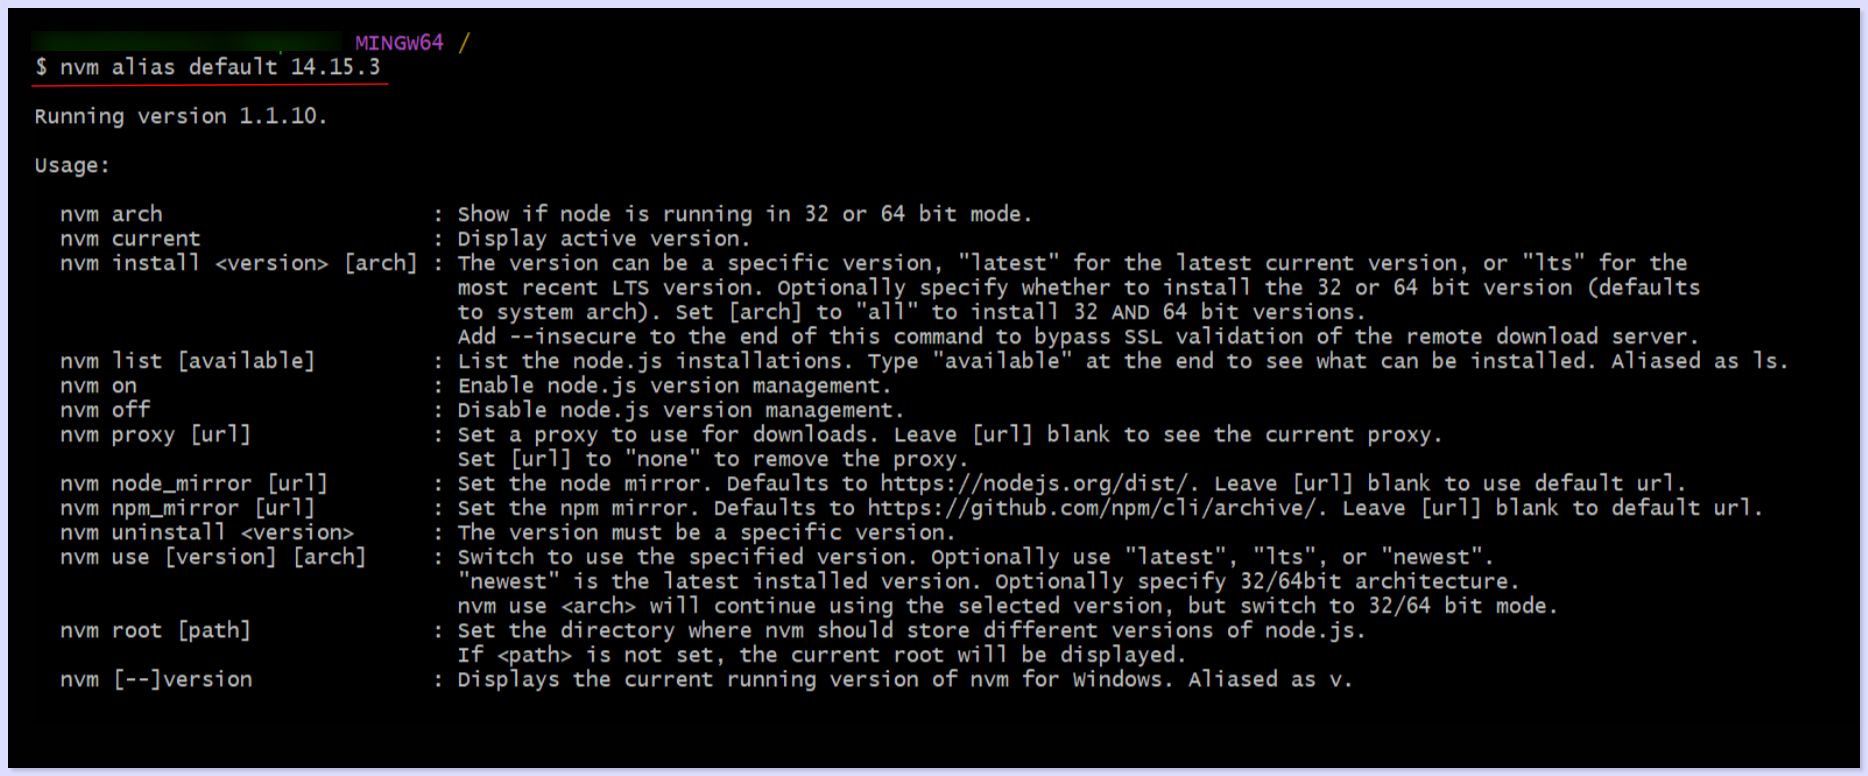
This command sets the specified version as the default version of Node.js. Whenever you open a new terminal window or start a new shell session, nvm will automatically use the default version you've set.
b) Check Node.js Version
To verify that the Node.js version has been changed, run the following command:
node -v
Output:

This command prints out the currently active version of Node.js. If you've followed the steps correctly, it should display the version you installed and set as default.
These steps allow you to manage and switch between different versions of Node.js on your system using nvm.
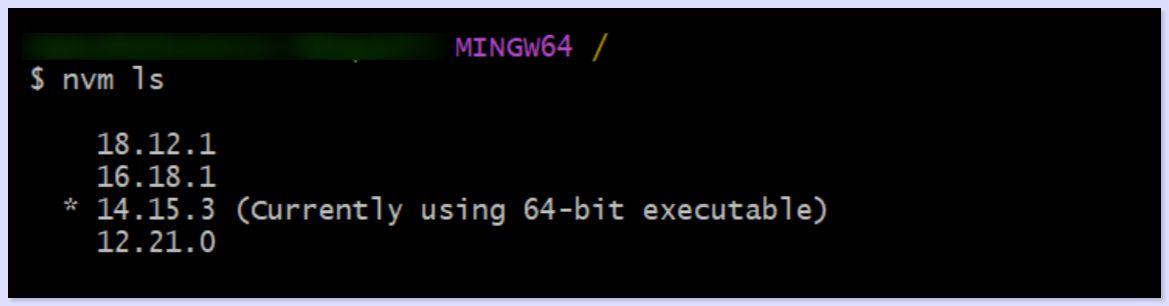
c) Know what nvm node versions you have in your system.
nvm lsOutput:
Step 4: Change to a specific version of Node
To switch to a specific Node.js version, you use the nvm use command followed by the version number you want to switch to.
nvm use <version>Output:

In the example, nvm use 14 switches to node version 14.
Switching Between Major Versions:
If you only specify the major version without the minor and patch versions, NVM will automatically switch to the latest installed version within that major version.
nvm use <major_version>Output:
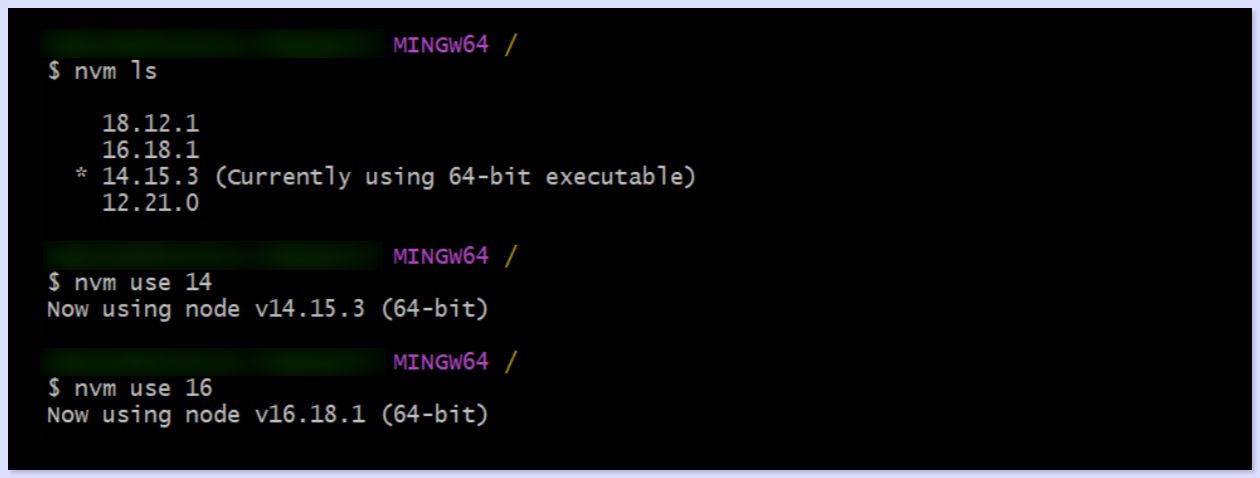
For example, nvm use 16 switches to the latest installed Node.js version that starts with 16.
Conclusion:
Without NVM, manually handling Node.js versions becomes a more cumbersome task, leading to potential compatibility issues and inefficiencies in the development workflow.
In essence, NVM is an important tool that empowers every Node.js developers to maintain a flexible and efficient development environment tailored to the specific version requirements of their projects.
Here is a NVM Cheatsheet, which makes your node version management more easier and simplier
Here are some installation and version changing NVM commands:
1. Install Node.js
nvm install 2. Use a Specific Node.js Version
nvm use3. Switch to the Latest Installed Node.js Version
nvm use <major_version>4. List Installed Node.js Versions
nvm list5. List Remote Node.js Versions
nvm ls-remote6. Set Default Node.js Version
nvm alias default7. List Available Node.js Versions for Installation
nvm list available8. Uninstall a Node.js Version
nvm uninstall9. Install Latest LTS (Long-Term Support) Version
nvm install --lts10. Install Latest Node.js Release
nvm install node11. Install Specific Architecture
nvm install --arch12. Install Node.js with a Custom Mirror
NVM_NODEJS_ORG_MIRROR=<mirror_url> nvm install 13. Custom Node.js Binary
nvm install --install-packages-from=Understand Exactly How Your Users Interact with Your Node.js app
ReplayBird, a digital user experience analytics platform designed specifically for Node.js developers with advanced insights to optimize your Node.js applications like a pro!
Unleash the power of behavioral insights with ReplayBird's intuitive heatmaps, session replays, and clickstream analysis allows you to visualize user behavior, identify popular elements, and detect pain points that might hinder user satisfaction.
Customer journey analysis and conversion funnels of ReplayBird to analyze deeper into user journeys, identify where drop-offs occur, and uncover conversion blockers.
Troubleshooting is now simpler with ReplayBird's robust debugging features. Detect and diagnose UX issues quickly, ensuring a seamless user journey from start to finish.
With ReplayBird, you have the ultimate toolkit to elevate your Node.js projects to the next level. The platform empowers you to create high-performing, user-centric applications that leave a lasting impression.
Try ReplayBird 14-days free trial
Keep reading more:
 Velantina
 Velantina
 Velantina