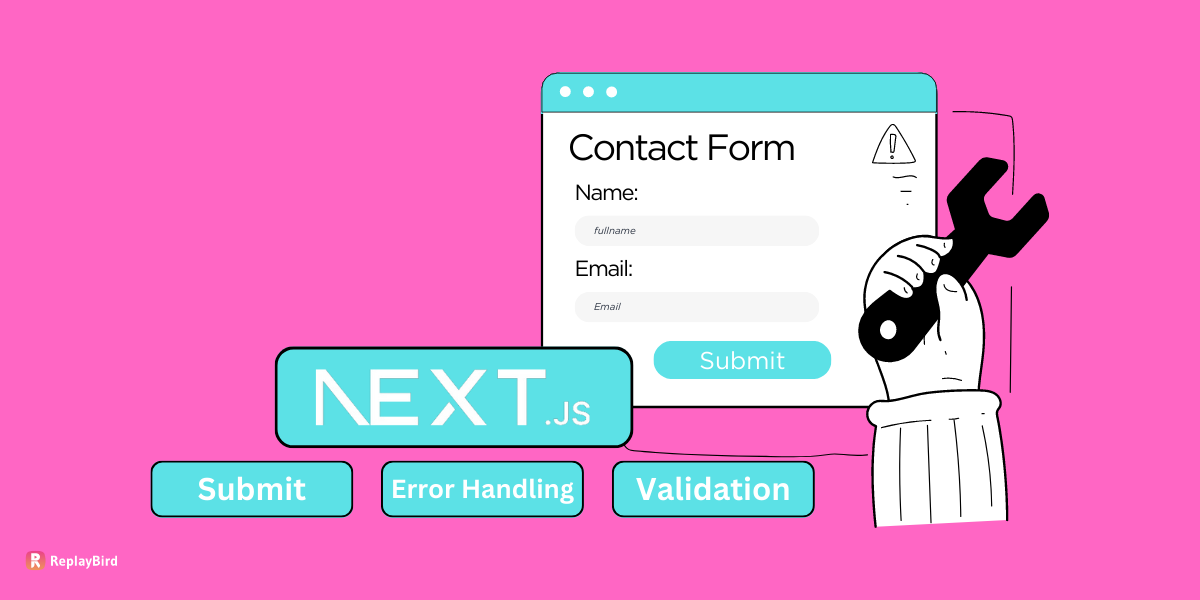
Next.js Forms are rapidly becoming popular among developers, as Next.js simplifies and streamlines form development.
When it comes to forms, Next.js has some tricks up its sleeve to make them work smoothly and look great. It's like having a trusty assistant that makes sure your form behaves just the way you want it to.
In this exploration, we will delve into Next.js Forms, uncovering the underlying mechanics that contribute to their rising popularity.
Next.js Forms represent a pivotal step forward in form development, promising efficiency and a touch of technology, with features such as data binding, validation, and seamless integration with routing and server-side processing.
- What are Next.js Forms?
- Steps to Build Next.js Forms?
- Next.js Form Validation Techniques
- How to Analyze Next.js Forms?
- How to Analyze JavaScript Errors of Next.js Forms?
What are Next.js Forms?
Next.js is a popular React framework for building web applications, particularly those that require server-side rendering, routing, and other advanced features.
When it comes to forms in Next.js, you can handle them just like you would in a regular React application, but Next.js provides some additional features and considerations to make the process smoother and more efficient.
Next.js seamlessly blends client-side rendering (CSR) and server-side rendering (SSR), allowing developers to choose the most suitable rendering approach for their forms.
This versatility ensures optimal performance and user experience by selectively rendering form elements on the server or client side based on application requirements.
Efficient navigation and routing of net.js forms are integral to web applications. Next.js Forms offer native integration with Next.js routing, enabling smooth transitions between form screens and enhancing the user journey.
Robust form validation and error handling mechanisms are important for data integrity and user experience. Next.js Forms let developers to implement client-side validation logic, ensuring that user inputs adhere to specified constraints before submission.
The Next.js provides middleware and hooks that can be used to customize form behavior, implement authentication, and execute pre- or post-submission actions.
Steps to Build Next.js Forms
Step 1: Create a Next.js Form API Route
We'll work on setting up a special route in Next.js that will take care of the form submissions. This special route, or API route, will do the behind-the-scenes work of handling the information you send from the form.
First, let's make a new folder named api inside the pages folder of your Next.js project. This is where we'll put the special route.
Inside the api folder, let's create a fresh new file called form.js.
Now, let's work on the code for this special route in the form.js file:
// pages/api/form.js

export default function handler(req, res) {
  const body = req.body; // Extract the data from the request body

  if (!body.name || !body.email ) { // Check if name or email is missing
    return res.status(400).json({ error: 'Oops! You missed some required fields.' }); // Send a 400 Bad Request response with an error message
  }

  return res.status(200).json({ data: body }); // If all required fields are present, send a 200 OK response with the submitted data
}
So, what's happening here? Well, we've created a route that's ready to handle any information you submit through the form.
If users accidentally forget to tell us their name, email, or message, we won't get upset – we'll just kindly let them know.
And when they do provide all the needed info, we'll make sure it's received properly and send you a friendly confirmation.
Client-side Error Handling in Next.js Forms
Let's see client-side validation and error messages in your Next.js form components. Here's an example of how you can do it:
  if ( !body.email ) { // Check if name or email is missing
    return res.status(400).json({ error: 'Oops! Please recheck your Email Id' }); // Send a 400 Bad Request response with an error message
  }

  return res.status(200).json({ data: body }); // If all required fields are present, send a 200 OK response with the submitted data
}
Step 2: Customize Next.js Form
Now that we've got our form handling set up, let's dive into making the form itself look and work just the way you want it to using the React components.
First off, let's create a special file named ContactForm.js in the components folder of your Next.js project.
Now, let's bring this form to life with some code:
export default function Form() {
  return (
	// Create a form element that sends data to "/api/submit" using the HTTP POST method
        <form action="/api/submit" method="post">
            <label for="name">Name:</label>
            <input type="text" id="name" name="name" required><br><br>

            <label for="email">Email:</label>
            <input type="email" id="email" name="email" required><br><br>

            <input type="submit" value="Submit">
        </form>
  )
}
Now, with this piece of code, we've created a form that listens to every keystroke and sends the important stuff over to our route when users hit that Submit button.
Step 3.1: Form Submit Without JavaScript
Let's see how to make your form work even if someone's turned off their JavaScript.
First things first, we're going to create a brand-new file called no-js-form.js inside the pages directory.
Now, let's put up some code to make it all work:
export default function FormWithoutJS() {
  return (
    // Create a form element that sends data to "/api/submit" using the HTTP POST method
    <form action="/api/submit" method="post">
      <label For="name">Name:</label>
      <input type="text" id="name" name="name" required />
      <br />
      <label For="email">Email:</label>
      <input type="email" id="email" name="email" required />
      <br />
      <button type="submit">Submit</button>
    </form>
  )
}
This code creates a page that includes a form with the same fields as the previous example.
However, this time, the form has an action attribute pointing to the API route. when they hit that Submit button, the form data is sent to the server via the /api/submit route without the need for JavaScript.
Step 3.2: Form Submit with JavaScript
Let's see the form submission with a touch of JavaScript, First, we'll create a new file called js-form.js in the pages directory.
export default function FormWithJS() {
  // This function handles the form submission event
  const submitContactForm = async (event) => {
    event.preventDefault(); // Prevent the default form submission behavior

    // Extract the values of the "name" and "email" inputs from the form
    const data = {
      name: event.target.name.value,
      email: event.target.email.value,
    };

    // Convert the data to JSON format
    const JSONdata = JSON.stringify(data);

    // Define the API endpoint where the form data will be sent
    const endpoint = '/api/submit';

    // Set up options for the fetch request
    const options = {
      method: 'POST', // Use the POST method to send data
      headers: {
        'Content-Type': 'application/json', // Specify the content type as JSON
      },
      body: JSONdata, // Set the request body to the JSON data
    };

    // Send the form data to the API endpoint using fetch
    const response = await fetch(endpoint, options);

    // Analyse the response data as JSON
    const result = await response.json();

    // Display an alert with the result data (in this case, the submitted email)
    alert(`Please recheck Your E-Mail ID ${result.data}`);
  };

  return (
    <form onSubmit={submitContactForm}>
      <label For="name">Name:</label> {/* Label for the "name" input */}
      <input type="text" id="name" name="name" required /> {/* Text input for the user's name, marked as required */}
      <br /> {/* Line break for spacing */}
      <label For="email">Email:</label> {/* Label for the "email" input */}
      <input type="email" id="email" name="email" required /> {/* Email input for the user's email, marked as required */}
      <br /> {/* Line break for spacing */}
      <button type="submit">Submit</button> {/* Submit button to trigger the form submission */}
    </form>
  );
}
In this code, the JsForm component is similar to the ContactForm component but adds JavaScript handling for form submission and displaying an alert with the submitted name upon successful submission.
Next.js Form Validation Techniques
Form Validation is like a digital proofreader that makes sure the things you type into a website are right.
There are two main ways this checking happens:
- Client-side: It's like having that watchful friend look at the information right on your computer or phone (in the web browser).
- Built-in: This uses simple commands that you put in the form's code. It's like telling your watchful friend some basic rules to follow.
- JavaScript-based: This is a bit fancier – you give your watchful friend more detailed instructions using a special code language called JavaScript. It's like teaching your friend some secret moves to catch any mistakes.
- Server-side: It's like sending the information to a wise supervisor on the website's computer (server) to make sure everything is correct.
Built-in Next.js Form Validation:
Built-in Form Validation makes your online forms smarter by adding rules that help users enter information correctly.
required: User can't submit the form until they've filled in these required fields.
type: You can tell your form what type of information should go into each field. For example, you can label a field as "email" so that user know they need to enter an email address.
minLength: User can set a minimum length for text.
maxLength: User can set a maximum length for text in your form.
With these built-in validation rules, if someone tries to submit the form by submitting a wrong or invalid Email address, they'll see an error message reminding them to fill with a valid Email address.
JavaScript-based Next.js Form Validation:
JavaScript-based Next.js Form Validation acts like an extra layer of checking alongside the natural rules that HTML form fields have. Developers often choose JavaScript for this job because it's fast and can handle data quickly. However, there's a small catch: while this kind of checking is quick.
JavaScript-based Next.js Form Validation:
function nextjsFormValidationWithJS() {
const name = document.querySelector('#name').value
const email = document.querySelector('#email').value
if (!name) {
alert('Please Enter Full Name.')
return false
}
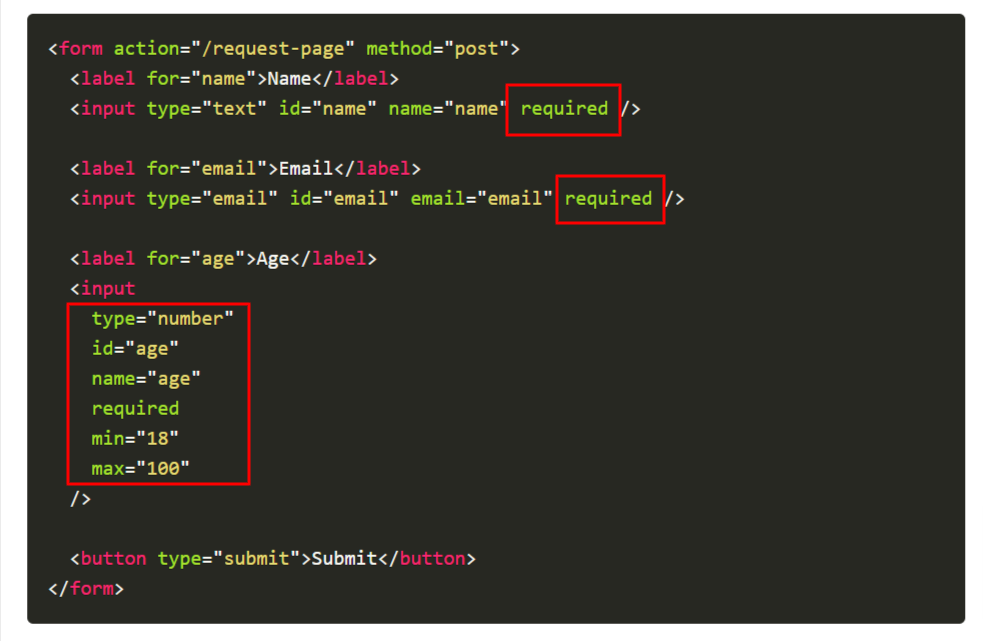
if (age.type < 18) {
alert('You must be 18 or above to register.')
return false
}
}const name = document.querySelector('#name').value: This line grabs the value entered in the field with the IDnameand stores it in a variable calledname.const email = document.querySelector('#email').value: This line does the same thing for the email field, storing its value in the variableemail.if (!name) { ... }: Thisifstatement checks if thenamefield is empty. If it is, a pop-up alert appears saying "Please Enter Full Name." and the function stops running withreturn false, indicating there's a problem.if (!age) { ... }: Thisifstatement tries to check if theagefield's type< 18.
Keep in mind that this code operates within the context of a web page. When specific conditions are unmet, such as an empty name or a short email, it triggers alert messages to guide the user.
How to Analyze Next.js Forms?
Analyzing Next.js forms built with JavaScript or without JavaScript can be inspected with form's structure, user behavior, and handling of JavaScript errors.
ReplayBird's Form Analysis tracks and records user interactions within forms, such as text input, dropdown selections, button choices, checkbox selections, and button clicks. Capture the sequence and timing of these interactions, with insights into how users navigate through different fields and elements within a form.
Track user interactions within forms and identify at which specific form fields or steps users are dropping off or abandoning the form. Insights into important where users might be experiencing issues or disengaging. By pinpointing these drop-off points, you can focus their optimization efforts on those areas to reduce abandonment rates.
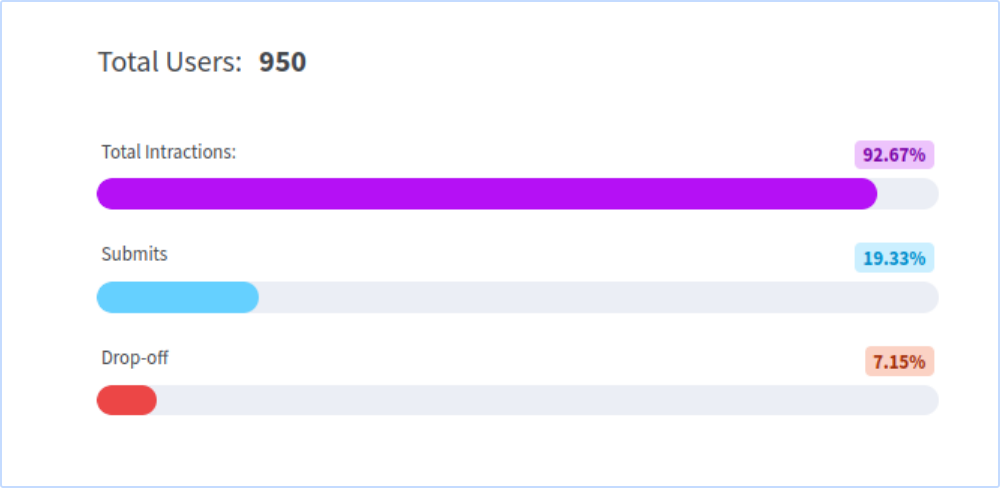
ReplayBird measure user interaction with individual form fields. Next.js users can see which fields receive the most interactions, such as clicks, text inputs, and selections. This information can guide Next.js developers in prioritizing form elements, making key fields more prominent, and optimizing the overall form layout.
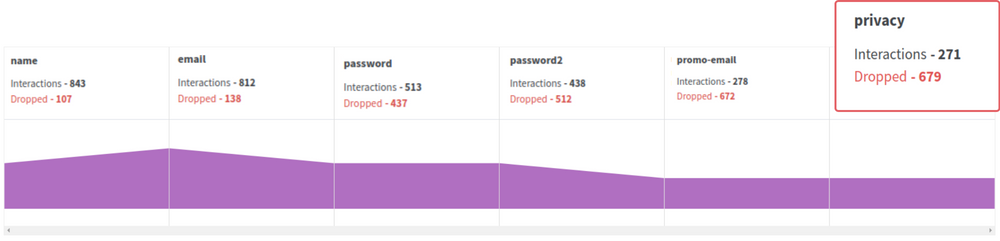
ReplayBird's Form Analysis reveal which fields users tend to abandon or hesitate on. Highlighted potential usability issues or confusing form elements into form fields or validations to reduce hesitation and improve completion rates.
How to Analyze JavaScript Errors of Next.js Forms?
Open the JavaScript code that's associated with the Next.js form. Look for event listeners attached to the form elements, especially the submit button. Go through the JavaScript code responsible for validating the form data and handling submissions. Pay attention to functions that run when the form is submitted.
Identify potential JavaScript errors from code editors or integrate development environments (IDEs) that provide code analysis and error highlighting to catch these issues.
Numerous JavaScript error analysis tools, like ReplayBird, track frontend errors in your Next.js applications, including forms.
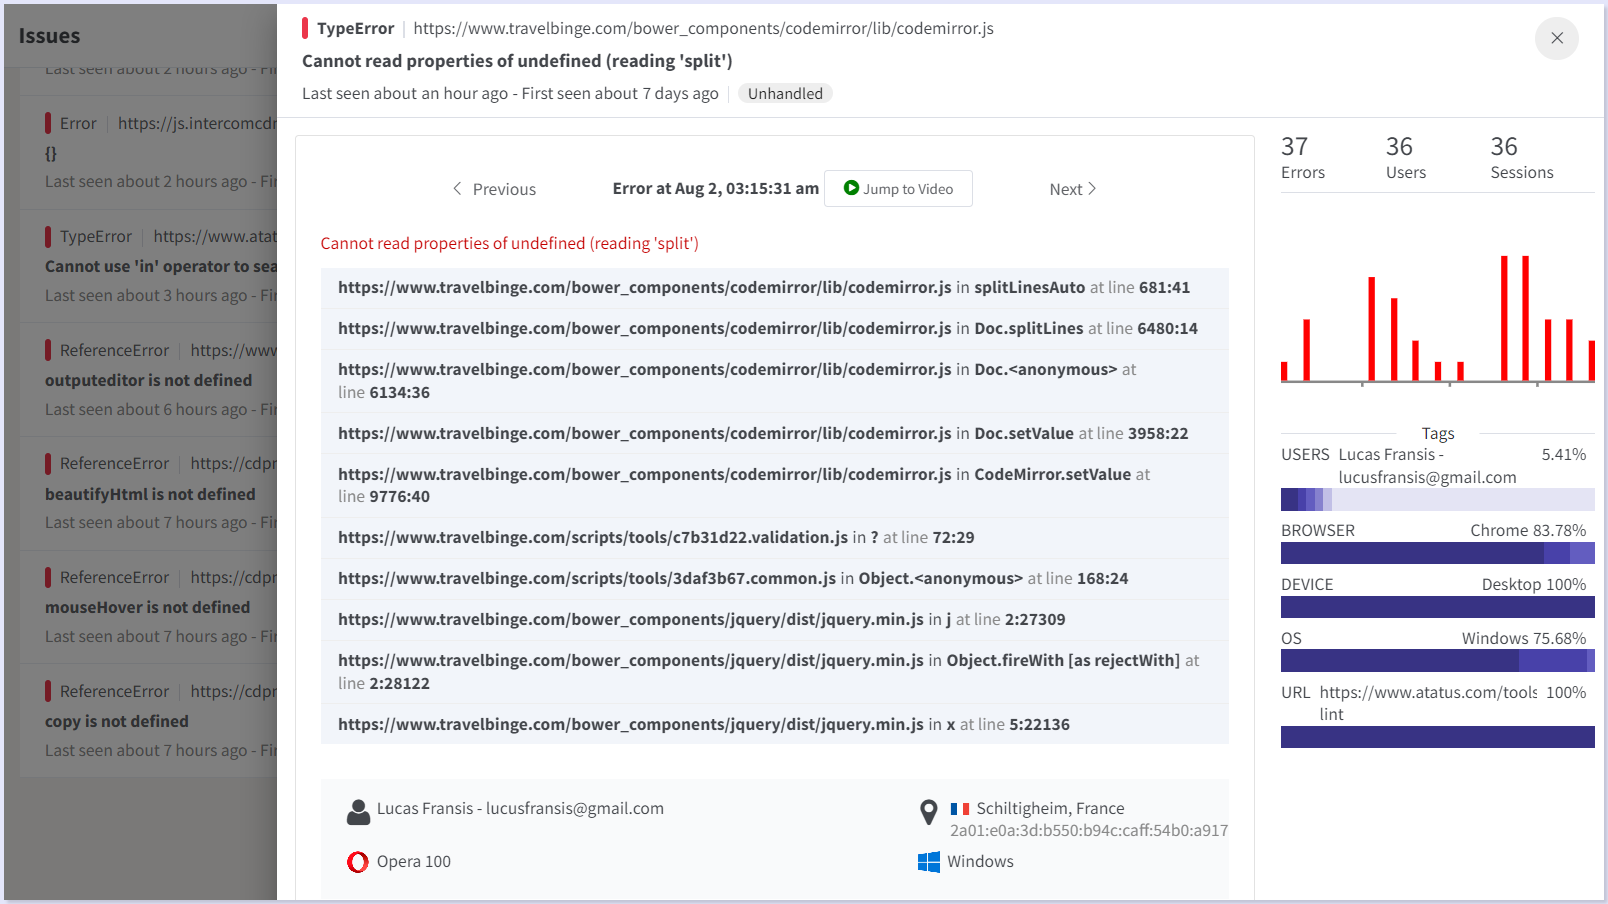
You can effectively analyze forms built with JavaScript, identify any JavaScript errors, and work toward resolving them to ensure the form functions smoothly for users.
Try ReplayBird 14-days free trial
Conclusion:
Next.js Forms are like your robust tool in the world of web development – they're here to make your life easier and your user experiences more awesome. In this guide, we've taken a deep dive into the form validation, submission, and handling errors within the Next.js framework.
Next.js Forms offer a bridge between innovation and practicality. They combine the familiarity of React with Next.js's advanced capabilities, resulting in a form-building experience that is efficient, customizable, and user-centric.
From understanding the form validation, from both client-side and server-side, to error messages that guide users toward accurate submissions, we've covered the essential aspects that contribute to the success of Next.js Forms.
The complexities of JavaScript-based validation, shedding light on its nuances and revealing how it complements the built-in form validation options.
Keep Reading about Next.js
 Uma
Uma Velantina
 Velantina