Next.js is an open-source framework for developing server-rendered React applications. Next.js is a streamlined development process and robust feature set; Next.js has become an amazing option for many developers in search of to creating dynamic and SEO-friendly web applications.
Next.js can do server-render React components, which can help your website and application's faster page load times and improve search engine optimization.
Next.js has many features that literally amaze you, such as automatic code splitting, hot module replacement, and serverless deployment capabilities. These features can greatly simplify your development process and make it easier for developers to build high-performance applications with minimal setup time.
Additionally, Next.js has so many stunning components like useRouter hook, getServerSideProps, getStaticProps, Dynamic, ErrorBoundary, useEffect and useState hooks. Whereas, Next.js Link components is one of the component with easier rendering.
In this blog, we will look at how to handle Next.js link components. We will be discussing the following topics in the blog:
- Next.js Link component
- Link component props
- useRouter() hook and push() in Next.js link component
- Redirecting in Next.js link component
- Query parameter from router in Next.js link component
Next.js Link Component
The Next.js Link component is a pre-inbuilt component as it creates client-side links between pages in your application. You can also use it to navigate between different pages within your application without triggering a full page refresh.
The Link component in Next.js will automatically deal with the client-side routing for you, which may help you in the time when the user clicks on the link, and the new page will be loaded to render on the client side without requiring a full page refresh or a whole new server request.
The Link component in Next.js only works for internal links within your Next.js application. For an external page link or URL, you may have to use a regular <a> tag instead.
Next.js Link Component Props
In order to use the Link component effectively, it's important to understand that there are two Next.js Link component props, that are:
- Required props
- Optional props
The required props for the Link component are href and children. The href prop specifies the URL of the page that the link will navigate to, while the children prop specifies the content that will be rendered inside the link.
It can be a string or a React element. Without these props, the Link component will not function properly. It's also worth noting that the href prop should always be a relative URL, rather than an absolute URL.
In addition to the required props, there are several optional props that can be used with the Link component such as replace, and prefetch which we will look one by one explained.
Required Props
#1 Hrefs
The href prop is a required prop in the Next.js Link component. The href prop can define the target URL that the link should navigate to when clicked.
The href prop can even be a string as a static page, such as "/about" or "/contact". It can also be a dynamic route with parameters enclosed in brackets, such as /posts/[id].
When a user clicks on a link with a dynamic route, Next.js will automatically generate a new page with the appropriate URL in accordance with the parameter value.
Absolute URL
<Link href="https://replaybird.com/guides"> Read the Guides </Link>Relative URL
<Link href="/features"> ReplayBird Features </Link>import Link from 'next/link';
function Home() {
return (
<div>
<h1>ReplayBird!</h1>
<Link href="/about">Learn about our ReplayBird</Link>
</div>
);
}
export default Home;Clicking on the "About" link will navigate the user to the "/about" page.
The href prop always has to begin with a leading slash (/) to make sure that Next.js navigates to the correct route. If you omit the leading slash, the link will be interpreted as a relative URL, and Next.js may navigate to the wrong page.
Output:

Optional Props
#1 Prefetch
The prefetch prop is an optional prop in the Next.js Link component that specifies if the linked page should be prefetched in the background.
In prefetch, every time a user hovers over a link or a linked element, Next.js instantly prefetch or anticipates the linked page in the background to improve the user's experience by reducing the detected load time when they navigate to the linked page.
However, in some cases, you may want to disable this automatic prefetching, or you may want to prefetch a different page instead. This is where the prefetch prop comes in.
import Link from 'next/link';

function Home() {
  return (
    <div>
      <h1>ReplayBird!</h1>
      <Link href="/contact" prefetch={false}>Stay in touch with us</Link>
    </div>
  );
}

export default Home;
Output:

The prefetch prop can also be used to disable prefetching for the "/about" page. This can be useful if you know that the linked page is implausible to be navigated or if you want to reduce the background network traffic.
On the other hand, you can use the prefetch prop to prefetch a different page than the one linked to.
import Link from 'next/link';

function Home() {
  return (
    <div>
      <Link href="/blog" prefetch> Read our ReplayBird Blogs </Link>
    </div>
  );
}

export default Home;
Output:
The prefetch prop should be used with certainty since it might increase network traffic and memory use. It's best to just prefetch sites that are likely to be viewed and to avoid prefetching huge or resource-intensive pages.
#2 Replace
The replace prop is another optional prop in the Next.js Link component that determines whether the linked page should be added to the browser's session history or whether it should replace the current page in the history.
By default, every click on a link created using the Next.js Link component, the linked page is added to the browser's session history, letting the user access the back button to navigate back to the previous page. Even so, in some cases, you may want to replace the current page in the history with the linked page, practically skipping the previous page in the user's history.
import Link from 'next/link';

function Home() {
  return (
    <div>
      <Link href="/pricing/" replace>
        Check out pricings!
      </Link>
    </div>
  );
}

export default Home;
Output:

In replace prop, the user will not be able to navigate back to the previous page using the back button, so you may have to use it logically and only in cases where it makes sense for the user flow.
Legacy Props:
There are also many other optional props in the Next.js link component of which are currently under legacy props; that means you will be able to access these optional props with 12 or any previous version of Next.js, but the next release of the 13th version will not allow a user to access the following optional props:
aspassHref- legacyBehavior -
<a>element is no longer required as a child of<Link>.
useRouter() Hook and Push() in Next.js Link Component
The useRouter is a built-in hook that let user to achieve the usage of router object in Next.js. It manages all the routing among different url pages of your Next.js application.
The push() is a method of the router object that let users to navigate to a different page in response to a user action, like a button click or a form submission.
We are using useRouter hook component here in this next.js code.
First, we need to import both useRouter from the "next/router" and link from "next/link". Add const constants router, and we command to useRouter for a function called pricing to the specific page mentioned.
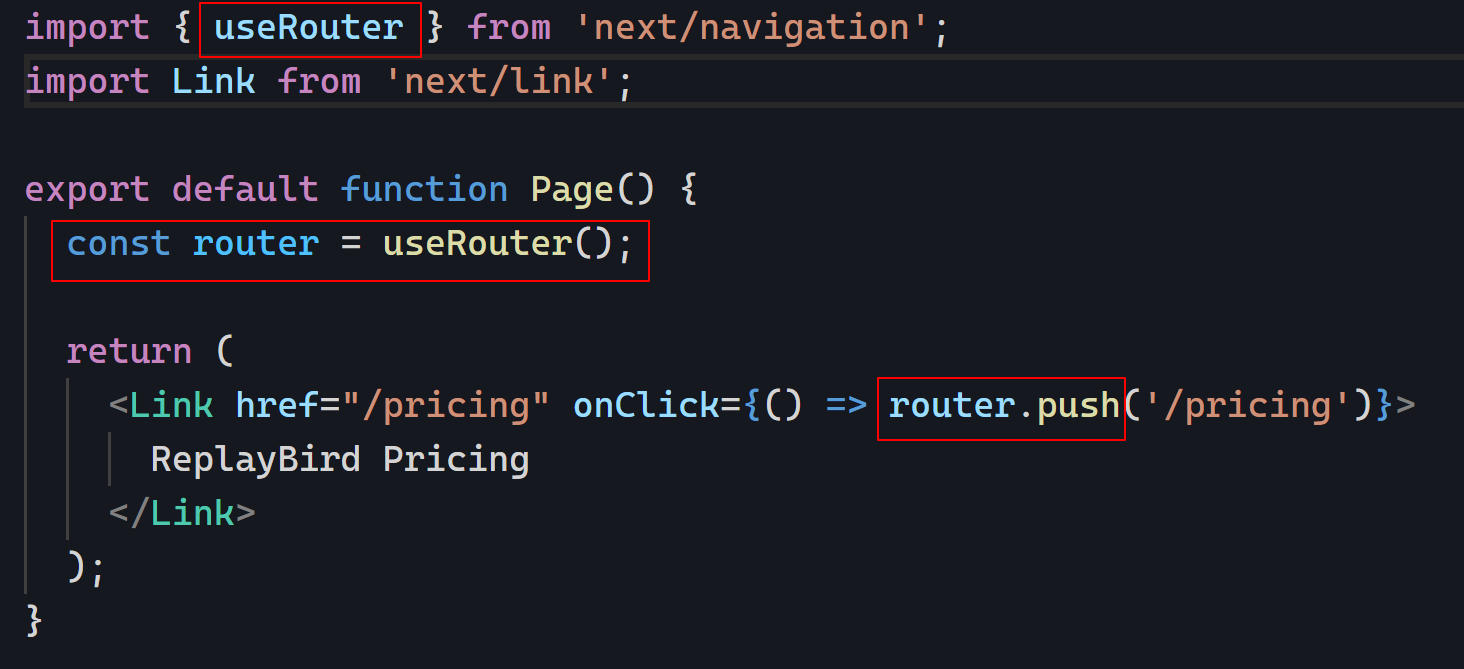
Let us make the link on onClick router.push to make sure it takes the user to the mentioned page. As we are using link component, the router takes the user to the mentioned page with the next routing without any remount react in it. Using these current router objects allows users to navigate from page to page within applications without any load time.
import { useRouter } from 'next/navigation';
import Link from 'next/link';

export default function Pricing() {
  const router = useRouter();

  return (
    <Link href="/pricing" onClick={() => router.push('/pricing')}>
      ReplayBird Pricing
    </Link>
  );
}
Output:
Redirecting for Link Component in Next.js
Redirect in Next.js link component works with useRouter() hook to easily use the router object to access the push() technique to change the URL and switch to the new page without any load time.
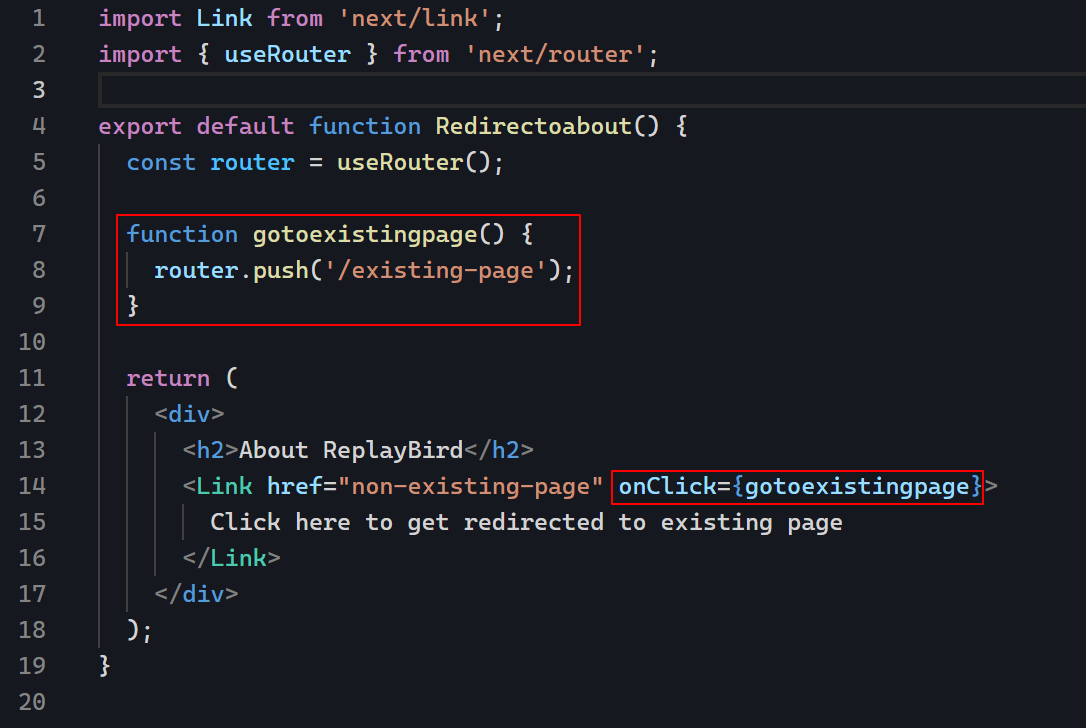
Let us first import both useRouter from the "next/router" and in Next.js link component from "next/link".
Then we will be adding our export function as usual for router with useRouter() and in the line we are adding another function, "gotoexistingpage" with router.push() which means wherever the element with a wrong link is given a function to "gotoexistingpage" it is commanded to take us to the "/existing-page".
import Link from 'next/link';
import { useRouter } from 'next/router';

export default function Redirectoabout() {
  const router = useRouter();

  function handleClick() {
    router.push('/existing-page');
  }

  return (
    <div>
      <h2>About ReplayBird</h2>
      <Link href="non-existing-page" onClick={handleClick}>
        Click here to get redirected to existing page
      </Link>
    </div>
  );
}
Output:

Query Parameter for Next.js Link Component
A query parameter in Next.js is a way to pass data to a page as part of the URL. A query parameter is a pass of the ID, like this /page?id=544.
We are again using useRouter hook by Next.js to pass query parameters from a router to a Link component. Let us first import both useRouter from the "next/router" and link from "next/link".
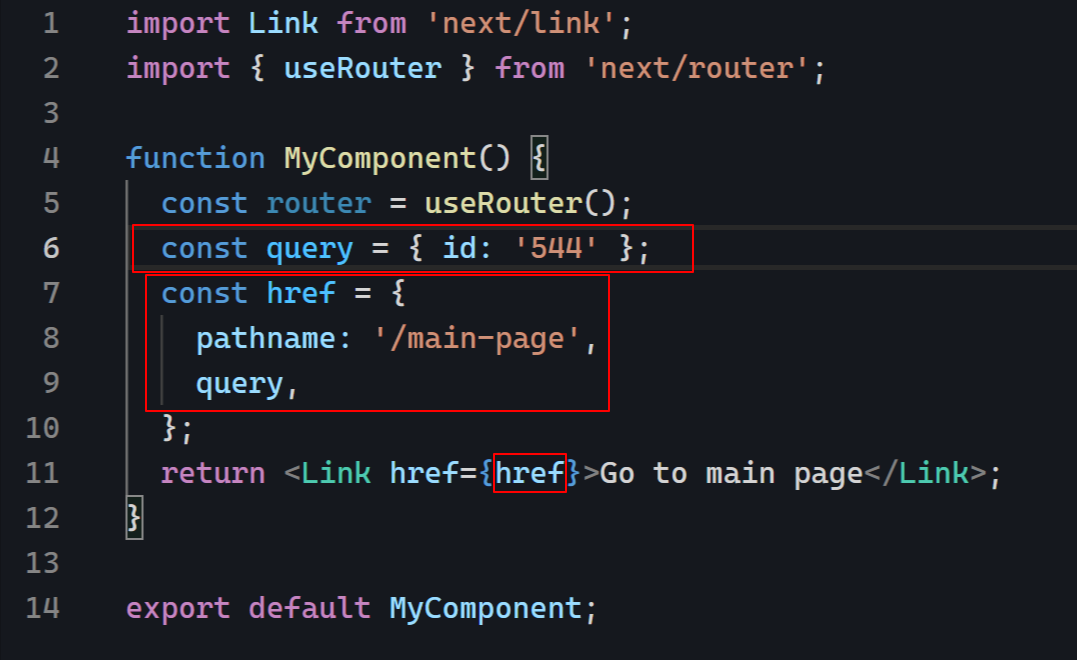
We have created an object query that contains the query parameters we want to pass to the next page. We use this object to create the href object that we pass to the Next.js Link component.
When the user clicks on the link, Next.js will navigate to the /main-page?id=544 URL, passing the id parameter with a value of 544. You can replace id with the name of your query parameter and 544 with the value you want to pass.
import Link from 'next/link';
import { useRouter } from 'next/router';

function MyComponent() {
  const router = useRouter();
  const query = { id: '544' };
  const href = {
    pathname: '/main-page',
    query,
  };
  return <Link href={href}>Go to main page</Link>;
}

export default MyComponent;
Output:

Conclusion:
The Next.js framework is easy of use and its high-performance capabilities, has recently launched an updated version of their Next.js link component, which is designed to make creating links between pages more straightforward.
This latest update includes makes it easier for developers to create links, such as the ability to add custom classes, prefetching, and redirect restoration to quickly navigate without any load time, easy functional and also visually appealing.
ReplayBird - Driving Revenue and Growth through Actionable Product Insights
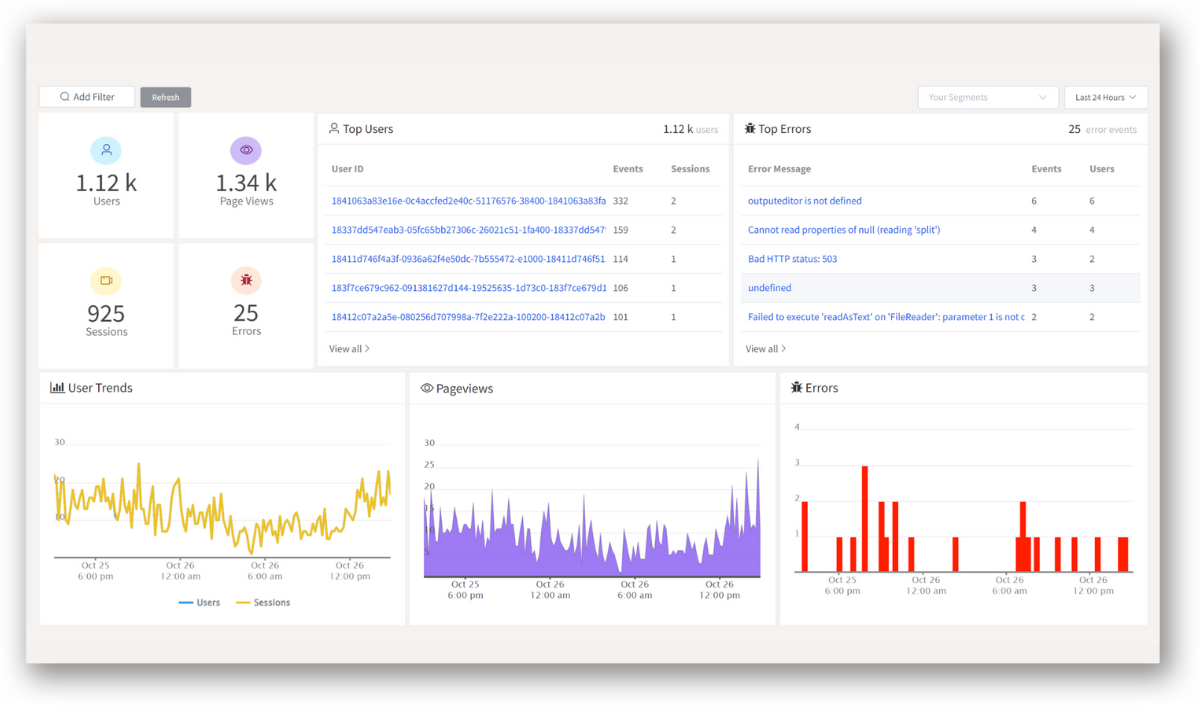
ReplayBird is a digital experience analytics platform that offers a comprehensive real-time insights which goes beyond the limitations of traditional web analytics with features such as product analytics, session replay, error analysis, funnel, and path analysis.
With Replaybird, you can capture a complete picture of user behavior, understand their pain points, and improve the overall end-user experience. Session replay feature allows you to watch user sessions in real-time, so you can understand their actions, identify issues and quickly take corrective actions. Error analysis feature helps you identify and resolve javascript errors as they occur, minimizing the negative impact on user experience.
With product analytics feature, you can get deeper insights into how users are interacting with your product and identify opportunities to improve. Drive understanding, action, and trust, leading to improved customer experiences and driving business revenue growth.
Try ReplayBird 14-days free trial
Further Readings:
 Velantina
 Velantina
 Uma
Uma