Micro-frontend is a frontend architecture wherein the web application is divided into micro-apps working together. This concept is named after "micro services".
Here, the application is divided into many segments based on their functions. And each of these segments holds a front-end and back-end aspect to it.
This is useful when working on huge project with lots of web developers and designers. In such cases, it reduces the complexity of large tasks by breaking down front-end activities.
It avoids overloading of work and information and helps the team to work effectively.
Micro-frontend is achieved through library like React and framework like next.js.
- React is a JavaScript library which is used to build user interfaces and website development.
- Next.js is a framework that has React on its base and is used to create web applications.
Why use Micro-Frontend?
Micro-frontend makes your task easy with the coordination of segments working together. It has the following benefits:
-
Micro-frontend design simplifies the development process, making it easier to build and maintain large, complex applications. By breaking down the application into smaller, more manageable pieces, development teams can work more efficiently, release new features faster, and provide a better user experience.
-
Micro-frontend can help to improve collaboration between different teams working on a frontend application. By breaking down the application into smaller, modular components, each team can focus on a specific area of the application, work independently, and communicate effectively with other teams. This can help to improve productivity, reduce conflicts, and ensure that the application meets the needs of users and stakeholders.
-
The Micro-frontend architecture delegates work, which reduces the burden on web developers. With micro-frontend architecture, web developers can work on specific components of the application without having to worry about the entire codebase. This can help to reduce the workload and make it easier to keep the application up-to-date and error-free.
Micro-Frontend Example
Micro-frontend can be complicated when we actually look from a misunderstood perpective such as one interface integrated to multiple interface worked by multiple teams of people in any frontend framework you prefer.
Micro-Frontend example - Lets imagine that you are tasked with developing a large-scale e-commerce website. There are several teams working on different aspects of the application, such as the product catalog, shopping cart, and checkout process. In a conventional monolithic architecture, all teams would have to use the same frontend framework and language, which could lead to conflicts and slow development times.
However, with micro-frontends, each team can build their portion of the application utilizing the tools and technologies that work best for them.
For examples, the team working on the product catalog may prefer to use React, while the shopping cart team may prefer Vue and product display team has preferred Angular. Using micro-frontends, each team can independently develop and deploy their portion of the application without worrying about conflicts or dependencies with other teams.

Once each micro-frontend is developed, they can be seamlessly integrated into the larger application through a shared interface. This results in a large application composed of numerous small, independently deployable parts, instead of a single monolithic codebase.
Micro-frontends architecture can increase development speed, reduce team conflicts, and improve the scalability and maintainability of large-scale web applications.
If you want to visually illustrate this concept, you could create an image that displays each team working on their portion of the application using their preferred technologies, with the micro-frontends integrated into the larger application.
For all the four frontend frameworks you need to set up your development architectural environment.
Micro-frontend in Next.js
Firstly We would need to define the route for the Next.js micro-frontend, such as /products, as well as any shared data that it will need to access, such as product information from a shared API.
We can create the micro-frontend by creating a new Next.js application using the npx create-next-app command. We can then create a new page in the pages directory called products.js, which will handle the /products route. We can also define any components or styles that are specific to the micro-frontend in the components and styles directories.
// pages/products.js

import React from 'react';
import ProductList from '../components/ProductList';

const ProductsPage = () => {
  return (
    <div>
      <h1>Products</h1>
      <ProductList />
    </div>
  );
};

export default ProductsPage;
Define the shared data schema by ensuring consistency between different micro-frontends, we can define a clear data schema for the shared product information. For example, we could define a schema that includes properties like name, price, and description.
{
  "type": "object",
  "properties": {
    "name": { "type": "string" },
    "price": { "type": "number" },
    "description": { "type": "string" }
  }
}
Now let's fetch and display shared data and product information from a shared API using the getStaticProps or getServerSideProps methods in Next.js micr-frontend. We can then pass this data down to the ProductList component as a prop, which can display the list of products.
// components/ProductList.js

import React from 'react';

const ProductList = ({ products }) => {
  return (
    <ul>
      {products.map((product) => (
        <li key={product.id}>
          <h2>{product.name}</h2>
          <p>{product.description}</p>
          <p>{product.price}</p>
        </li>
      ))}
    </ul>
  );
};

export default ProductList;
// pages/products.js

import React from 'react';
import ProductList from '../components/ProductList';

const ProductsPage = ({ products }) => {
  return (
    <div>
      <h1>Products</h1>
      <ProductList products={products} />
    </div>
  );
};

export async function getServerSideProps() {
  const res = await fetch('https://example.com/api/products');
  const products = await res.json();

  return {
    props: {
      products
    }
  };
}

export default ProductsPage;
By following these steps, we have created a modular and independently deployable micro-frontend using Next.js that can be combined into larger architectural applications as needed.
Micro-frontend in React.js
Define the micro-frontend boundaries the same way like we did for next.js, let's say we want to create a micro-frontend that displays a list of blog posts. We would need to define the route for the micro-frontend, such as /posts, as well as any shared data that it will need to access, such as post information from a shared API.
We can create the micro-frontend by creating a new React.js application using the create-react-app command. We can then create a new component called PostList that will display the list of blog posts. We can also define any styles that are specific to the micro-frontend architecture in a separate CSS file.
// src/components/PostList.js

import React, { useState, useEffect } from 'react';
import axios from 'axios';

const PostList = () => {
  const [posts, setPosts] = useState([]);

  useEffect(() => {
    axios.get('https://example.com/api/posts')
      .then(response => {
        setPosts(response.data);
      })
      .catch(error => {
        console.log(error);
      });
  }, []);

  return (
    <div>
      <h1>Blog Posts</h1>
      <ul>
        {posts.map(post => (
          <li key={post.id}>
            <h2>{post.title}</h2>
            <p>{post.body}</p>
          </li>
        ))}
      </ul>
    </div>
  );
};

export default PostList;
To provide consistency between different micro-frontends, we can define a clear data schema for the shared post information. For example, we could define a schema that includes properties like title and body.
{
  "type": "object",
  "properties": {
    "title": { "type": "string" },
    "body": { "type": "string" }
  }
}
We can fetch the shared post information from a shared API using the useEffect hook and the axios library. We can then pass this data down to the PostList component as a prop, which can display the list of blog posts.
// src/App.js

import React from 'react';
import PostList from './components/PostList';

const App = () => {
  return (
    <div>
      <PostList />
    </div>
  );
};

export default App;
By following these steps, we can create a modular and independently deployable micro-frontend using React.js that can be combined into larger applications as needed.
Combine React.js and Next.js with Micro-Frontend
Create the micro-frontend: We can create a micro-frontend using React.js as described in the previous example. For this example, let's assume that the micro-frontend displays a list of blog posts and is accessible at the route /posts.
// src/components/PostList.js

import React, { useState, useEffect } from 'react';
import axios from 'axios';

const PostList = () => {
  const [posts, setPosts] = useState([]);

  useEffect(() => {
    axios.get('https://example.com/api/posts')
      .then(response => {
        setPosts(response.data);
      })
      .catch(error => {
        console.log(error);
      });
  }, []);

  return (
    <div>
      <h1>Blog Posts</h1>
      <ul>
        {posts.map(post => (
          <li key={post.id}>
            <h2>{post.title}</h2>
            <p>{post.body}</p>
          </li>
        ))}
      </ul>
    </div>
  );
};

export default PostList;
Define the Next.js application: We can create a larger application using Next.js that will incorporate the micro-frontend. For this example, let's assume that the application has a home page accessible at the route / and that we want to display the micro-frontend at the route /posts.
// pages/index.js

import React from 'react';
import Head from 'next/head';
import PostList from '../src/components/PostList';

const Home = () => {
  return (
    <div>
      <Head>
        <title>My App</title>
      </Head>
      <h1>Welcome to my app</h1>
    </div>
  );
};

const Posts = () => {
  return (
    <div>
      <Head>
        <title>Blog Posts</title>
      </Head>
      <PostList />
    </div>
  );
};

export default function App() {
  return (
    <>
      <Home />
      <Posts />
    </>
  );
}
Define the shared data schema: As before, we can define a clear data schema for the shared post information.
{
  "type": "object",
  "properties": {
    "title": { "type": "string" },
    "body": { "type": "string" }
  }
}
Fetch and display shared data: We can fetch the shared post information from a shared API using the useEffect hook and the axios library as before.
By following these steps, we can combine a micro-frontend built with React.js and a larger application built with Next.js, resulting in a cohesive and modular frontend.
Benefits of Micro-Frontend
Let us see why we should be using micro-frontends in projects:
- Improving app development - Working on huge projects could be tedious for developers. This could be made simpler if developers are working together simultaneously on micro-frontends having same objective in mind. Such coordination of efforts enhances app development process.
- Reduces time for end-users - The front-end experience of users is enhanced since developers work on the micro-frontend architecture. This results in efficiency of front-end features for the users.
- Better functionality - The front-end designs are improved to fulfill the needs of the user. Moreover, this adds to enhancement of user experience with better features and designs.
- Quality check - Working on micro-frontends ensures quality since it is easy to test individual components of application rather than the entire application. This helps you to find and handle API errors before the test-run of entire application. Working with smaller components would mean that you wouldwork on smaller codes and this has many benefits such as: lesser working time, avoids complexity in coding, makes debugging process easier, and avoids deviations in programming.
- Deployment – Using the architecture of micro-frontends, you can divide the single structureinto individual pieces. These individual pieces can be deployed independently. This helps you to focus on individual pieces without deviations.
- Security – You can use SSL certificate like Single Domain or a Wildcard, Multi Domain or aSAN SSL Certificate to keep your frontend safe. The multi domain certificate can secure sub-domains and multiple sites.
Thus, micro-frontends enable an easier testing process and enhance the application's quality.
Conclusion:
So, we looked at what micro-frontends and next.js are and had a brief through their advantages.
Moreover, we went through the timeline of micro-frontends. In addition, the concept of micro-frontends was detailed through examples and coding.
Furthermore, next.js is a useful and interesting framework which follows a simple micro-frontend architecture.
The micro-frontend has a simple coding style which keeps the web developers interested and makes their job easier.
Micro-frontends using React and Next.js are an amazing feature to work on which holdplenty of benefits for its users to reap from.
ReplayBird - Driving Revenue and Growth through Actionable Product Insights
ReplayBird is a digital experience analytics platform that offers a comprehensive real-time insights which goes beyond the limitations of traditional web analytics with features such as session replay, error analysis, and product analytics.
With Replaybird, you can capture a complete picture of user behavior, understand their pain points, and improve the overall end-user experience. Session replay feature allows you to watch user sessions in real-time, so you can understand their actions, identify issues and quickly take corrective actions. Error analysis feature helps you identify and resolve javascript errors as they occur, minimizing the negative impact on user experience.
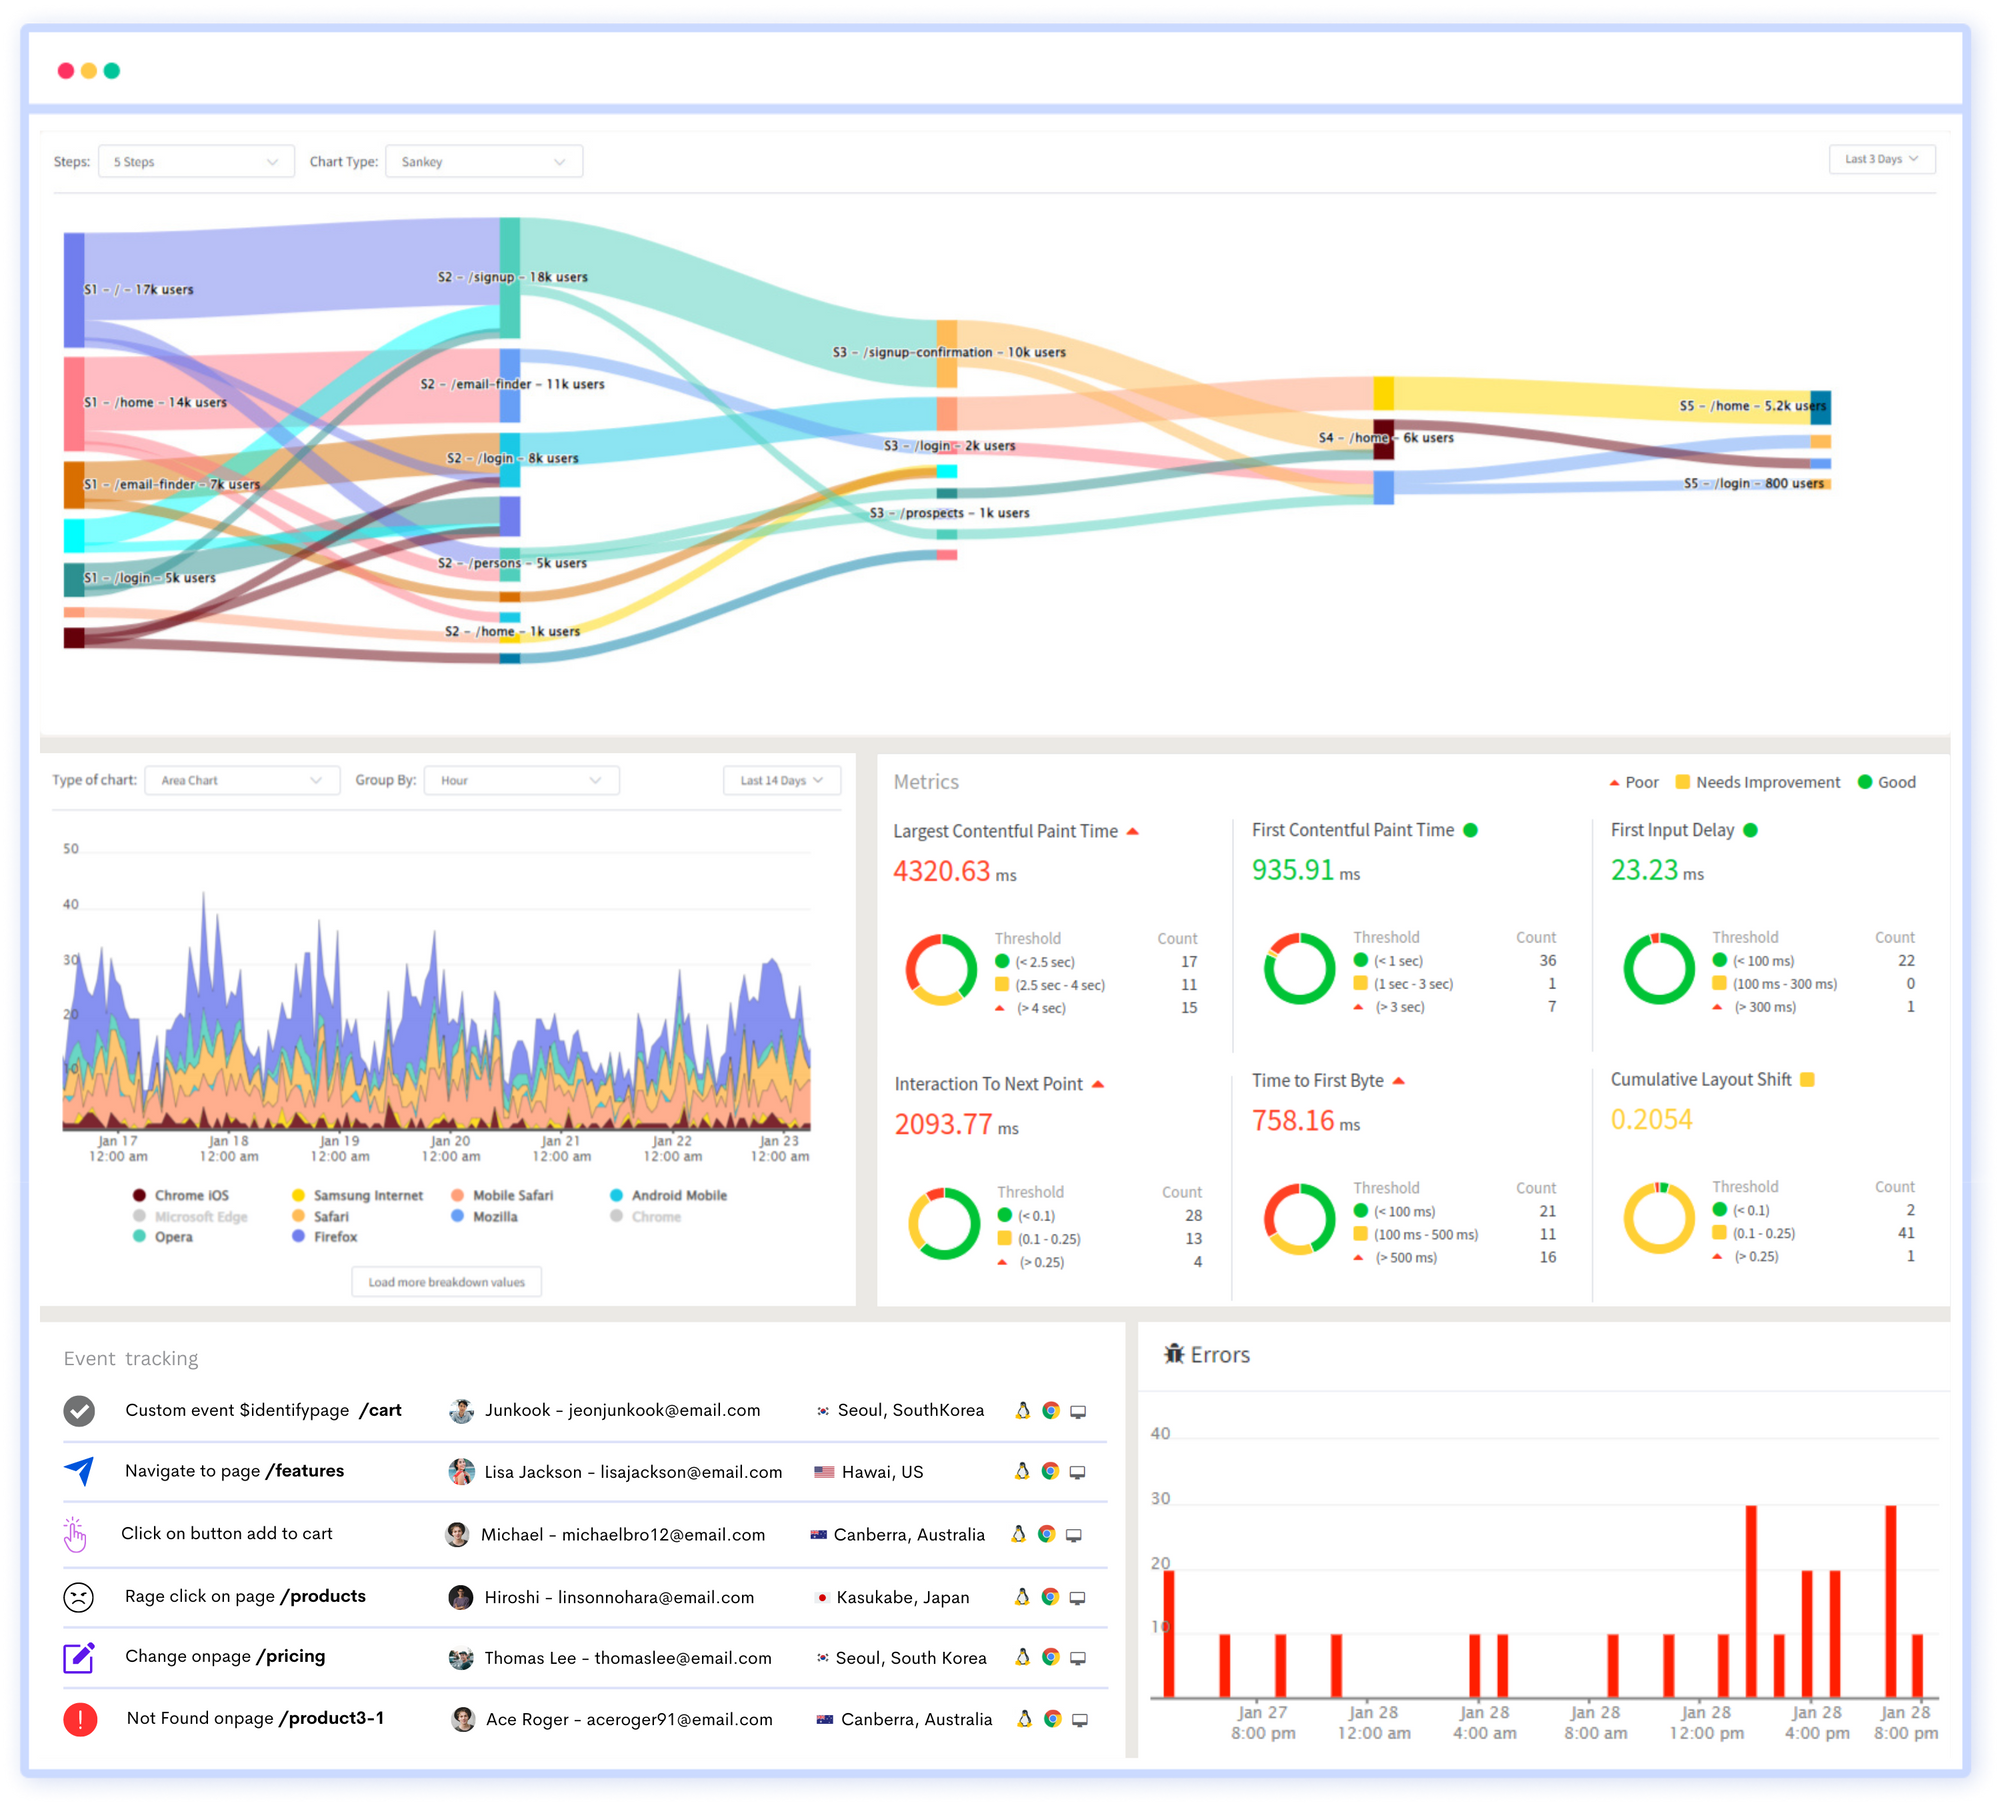
With product analytics feature, you can get deeper insights into how users are interacting with your product and identify opportunities to improve. Drive understanding, action, and trust, leading to improved customer experiences and driving business revenue growth.
Try ReplayBird 14-days free trial
Further Readings:
 Uma
Uma Velantina
 Uma
Uma