If you are a developer and have been working with JavaScript constantly, you should definitely know the JavaScript Array splice() method to easily and instantly modify arrays.
You can add, remove, or replace elements within an array, providing flexibility in array manipulation. By specifying parameters such as the start index, the number of elements to remove, and optional elements to add, splice() efficiently update the array in place.
It returns an array containing the removed elements, enabling further processing. splice() let developers adjust array contents, facilitating various data manipulation tasks within JavaScript applications.
- Syntax of the
splice()method in JavaScript - JavaScript Array Splice() Methods
- Result and Return Value of splice array in JavaScript
- Using Negative Indices
Syntax of the splice() method in JavaScript
The syntax of the splice() method in JavaScript is different from some other array methods because it serves a distinct purpose and requires parameters to define a range of elements to remove or add from/to an array.
array.splice(start); // start splicing array fromarray.splice(start, deleteCount); // start splicing array and delete the exact countarray.splice(start, deleteCount, item1); // start splicing array and delete the exact count followed adding the itemarray.splice(start, deleteCount, item1, item2, ...); // start splicing array and delete the exact count followed adding the item in respectivelyParameters
start: The index at which to start modifying the array. An integer representing the index at which to start modifying the array. Negative values are allowed, indicating an offset from the end of the array.deleteCount(optional): The number of elements to remove from the array. If set to 0, no elements are removed. If omitted, all elements fromstartto the end of the array are removed. An integer indicating the number of elements to remove from the array. If omitted or if greater than the number of elements fromstartto the end of the array, all elements fromstartto the end of the array will be removed.item1, item2, ...(optional): The elements to add to the array at the specified start index. If no elements are specified, only removal occurs, and no new elements are added. Elements to add to the array. If you don't specify any elements,splice()will only remove elements from the array without adding any new ones.
JavaScript Array Splice() Methods
Let's make this examples easier to understand and less complicated
#1 Removing Elements using JavaScript Array Splice():
First we will look into how to remove elements with JavaScript Array Splice() while also optionally inserting new elements in their place. We will look at this in Example 2. When using, splice() alters the original array directly, modifying its length and content. The method takes in parameters such as the start index and the number of elements to remove.
By specifying the index and count, you can precisely control which elements to remove from the array. Additionally, splice() returns an array containing the removed elements, letting further processing or storage of the removed data.
const array1 = ['a', 'b', 'c', 'd'];
const removed = array1.splice(2, 1); // applied splice
// removed is ['c']
Syntax used for removing an element with an array splice:
Array.splice(start, removeCount)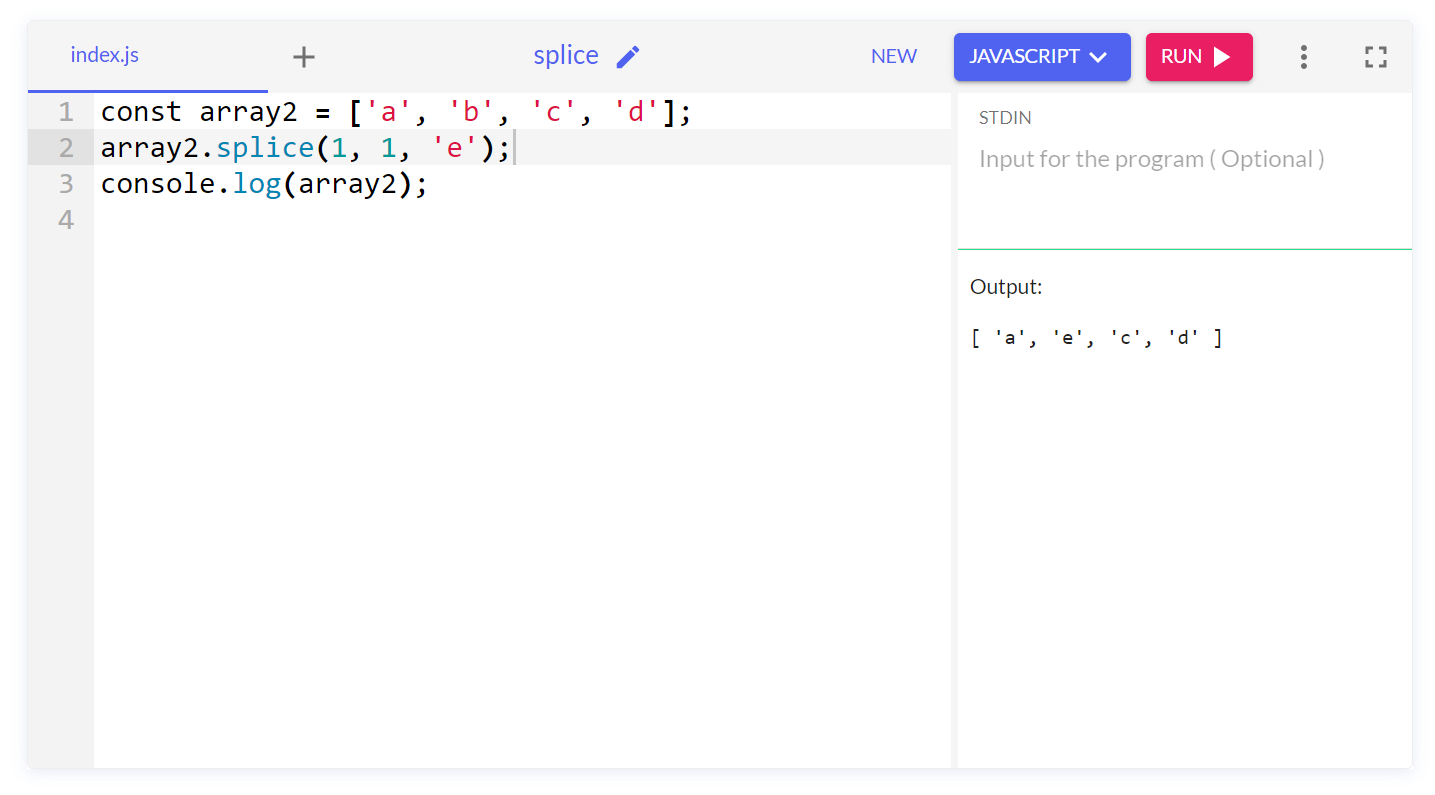
Let's modify array1 at index 2 and remove 1 element from those array parameters (2, 1). In this case, we remove the element 'c'. The splice() method returns an array containing the remaining elements, which is ['a', 'c', 'd'].
After the splice() operation, array1 is modified to ['a', 'b', 'd'] because we removed 'c' from index 2. The variable removed holds the removed element 'c' in an array: ['c'].
#2 Replacing elements using JavaScript Array Splice():
Secondly, we will look into how to replace elements using JavaScript's splice() method to replace elements, which lets developers control the modification of arrays by specifying the index of the element to replace and providing the replacement element(s). Which makes tasks such as data editing, sorting, and filtering within applications easier for developers to efficiently update array data structures in-place.
- Identify Index: First, you need to identify the index of the element you want to replace within the array. This index will be used as the
startIndexparameter for thesplice()method. - Call
splice(): Invoke thesplice()method on the array object. The method takes in multiple arguments:startIndex,deleteCount, and the replacement elements. - Specify Delete Count: The
deleteCountparameter determines the number of elements to remove, starting from thestartIndex. If you're replacing only one element,deleteCountshould be1. - Provide Replacement Element(s): After specifying the
deleteCount, you provide the new element(s) that will replace the removed element(s). These elements are passed as arguments to thesplice()method. - Mutation: The
splice()method modifies the original array by removing the specified number of elements starting from thestartIndexand then inserting the replacement element(s) at the same index. If you're only replacing elements without removing any,deleteCountwill be0. - Return Value: The
splice()method returns an array containing the elements that were removed from the original array. This array will contain the elements that were replaced, if any.
const array2 = ['a', 'b', 'c', 'd'];
// Replace 1 element at index 1 with 'e'
array2.splice(1, 1, 'e');
// array2 is now ['a', 'e', 'c', 'd']
Syntax used for replacing an element with an array splice:
Array.splice(start, removeCount, newItem)
#3 Adding elements using JavaScript Array Splice()
Here we will look into how to add a new element in JavaScript, the splice() method not only removes elements from an array but also let the addition of new elements at specified positions.
By passing appropriate parameters such as the start index, delete count, and new elements, you can make your data into arrays. splice() by adjusting array length and content, but with efficient in-place insertion of elements.
This functionality let you to augment array structures on-the-fly, accommodating changing data requirements within JavaScript applications. Whether appending elements to the end of an array or inserting them at specifc positions, splice() is a flexible way for modifying array contents.
const array3 = ['a', 'b', 'c', 'd'];
// Add 'e', 'f' starting at index 2
array3.splice(2, 0, 'e', 'f');
// array3 is now ['a', 'b', 'e', 'f', 'c', 'd']
Syntax used for adding an element with an array splice:
Array.splice(start, removeCount, newItem, newItem)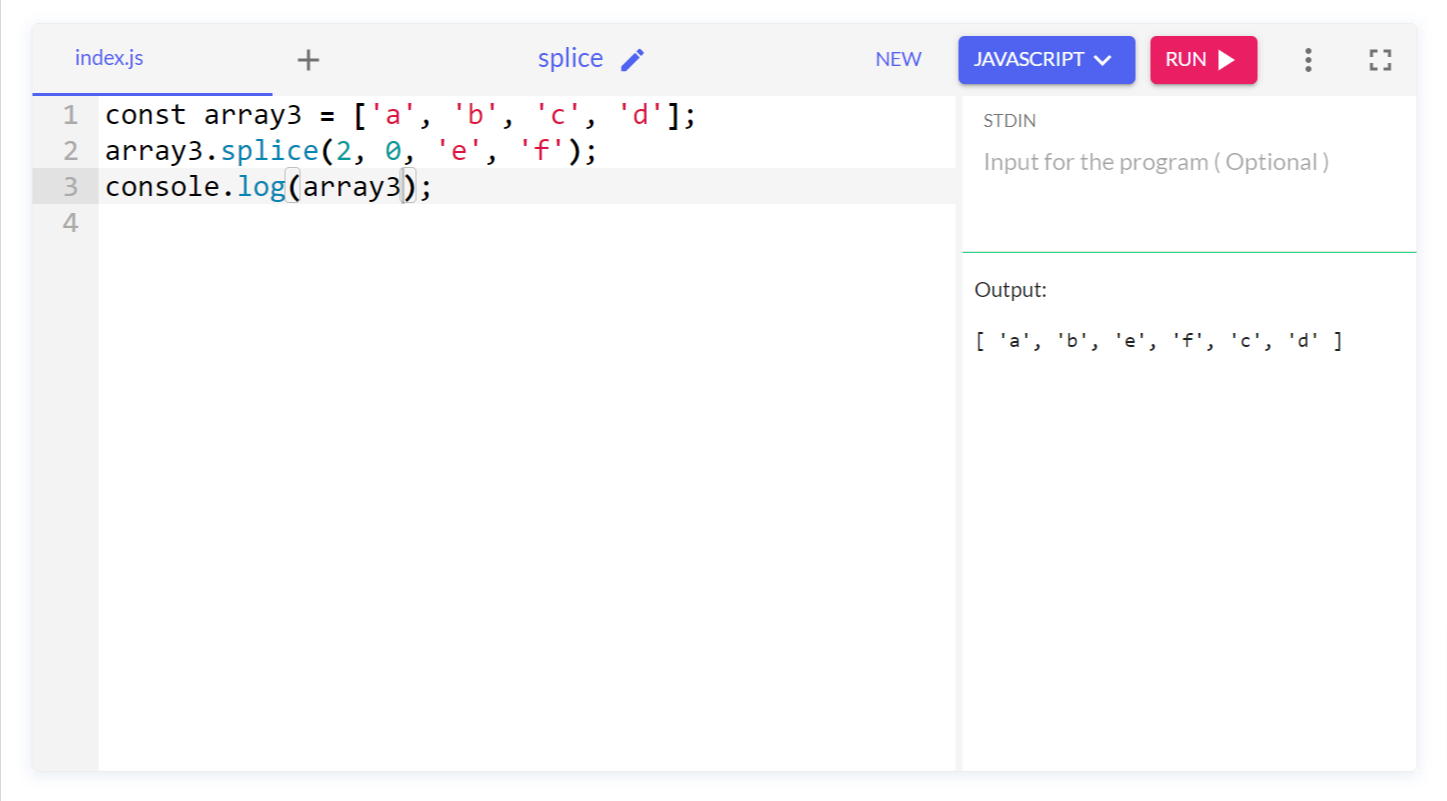
#4 Removing and replacing elements using JavaScript Array Splice()
Not only you can remove separately and replace separately but, you can actually do them in one go with the same splice code in JavaScript.
Additionally, with splice() you can also simultaneous insert new elements in place of the removed ones for a seamless modification of array contents, making it easy for tasks such as data editing and restructuring.
const array4 = ['a', 'b', 'c', 'd'];
const removedElements = array4.splice(1, 2, 'e', 'f', 'g')
Syntax used for removing and replacing an element with an array splice:
Array.splice(start, removeCount, newItem, newItem, newItem)
Also you can add multiple elements like in the following example:
const array4 = ['a', 'd', 'e', 'f'];
// Remove 2 elements starting at index 1, replace with 25 elements
const removedElements = array4.splice(1, 2, 'b', 'c', ...Array.from({length: 25}).map((_, index) => String.fromCharCode(103 + index)));
// array4 is now ['a', 'b', 'c', 'g', 'h', 'i', 'j', 'k', 'l', 'm', 'n', 'o', 'p', 'q', 'r', 's', 't', 'u', 'v', 'w', 'x', 'y', 'z', '{', '|', '}']
// removedElements is ['d', 'e']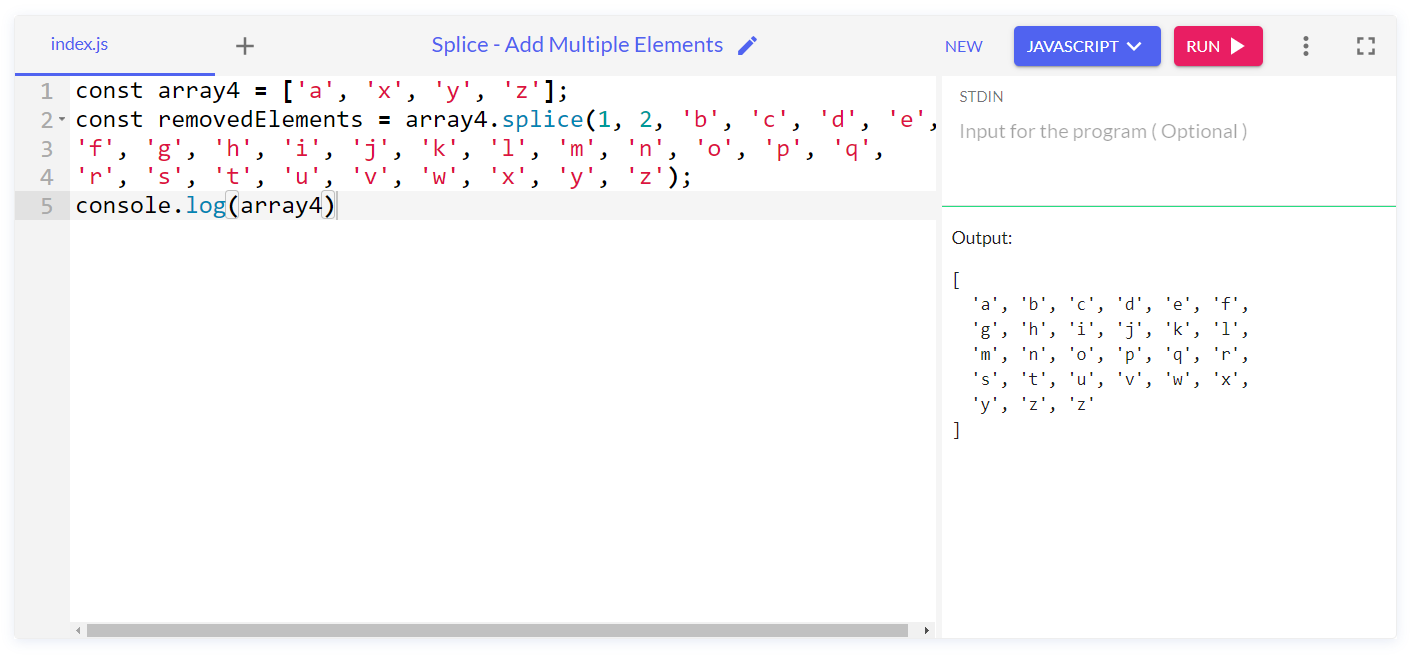
In this other example we will look into how we can add elements without actually mentioning elements.
...Array.from({length: 25}).map((_, index) => String.fromCharCode(103 + index))Array.from({length: 25}) This creates an array of length 25 filled with undefined values.
.map((_, index) => String.fromCharCode(103 + index)) This maps each element of the array to a letter of the alphabet. The _ parameter is a placeholder for the current element (which we don't use), and index is the index of the element in the array.
We have now used String.fromCharCode(103 + index) to convert the ASCII code 103 + index to a character. ASCII code 103 corresponds to the letter 'g', so adding index to it generates subsequent letters of the alphabet.
const array4 = ['a', 'x', 'y', 'z'];
const removedElements = array4.splice(1, 2, 'b', 'c', .Array.from({length: 20}).map((_, index) => String.fromCharCode(103 + index)));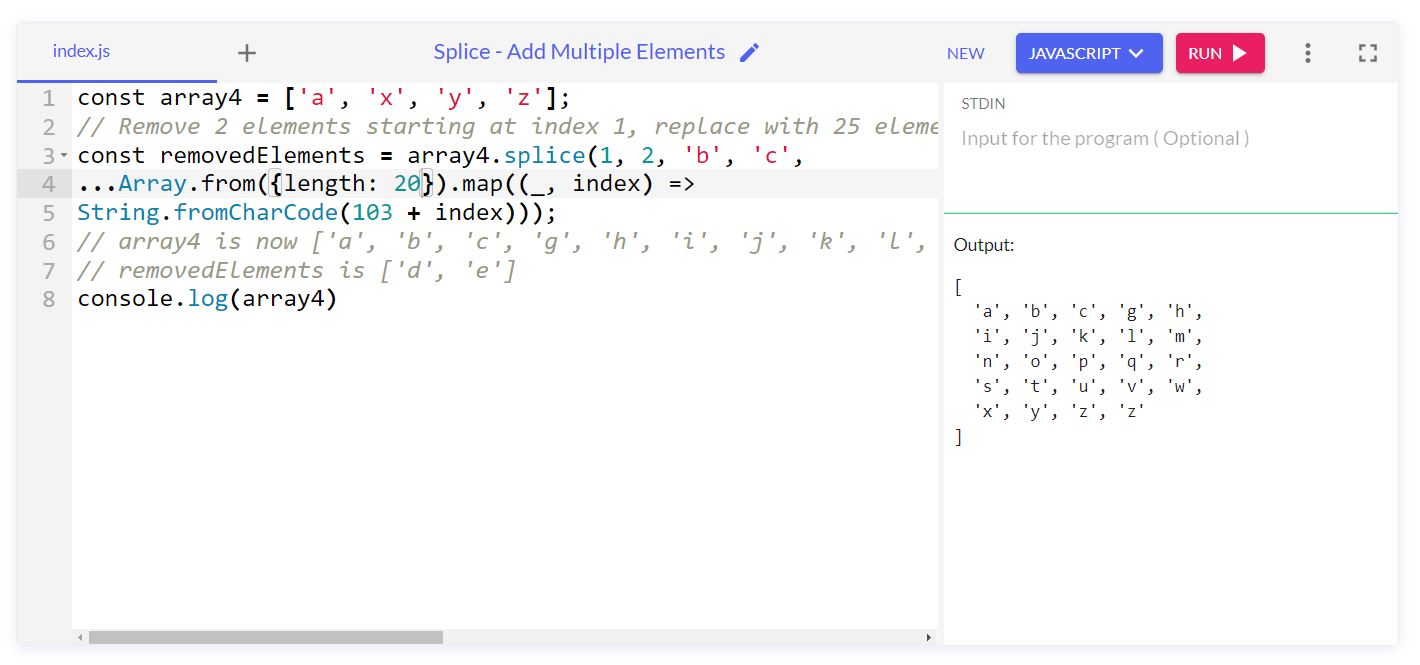
#5 Removing all elements using JavaScript Array Splice()
Finally, we will look into how to remove all the elements of the array In JavaScript, the splice() method efficiently removes all elements from an array by specifying the start index as 0 and omitting the delete count parameter.
This is one of the methods to delete your elements instantly, which empties the array while preserving its structure, providing a concise and straightforward way to clear the array contents.
const array5 = ['a', 'b', 'c', 'd'];
// Remove all elements starting at index 0
const removedAll = array5.splice(0);
// array5 is now []
// removedAll is ['a', 'b', 'c', 'd']
Syntax used for removing all elements with an array splice:
Array.splice(start) //array is cut from starting point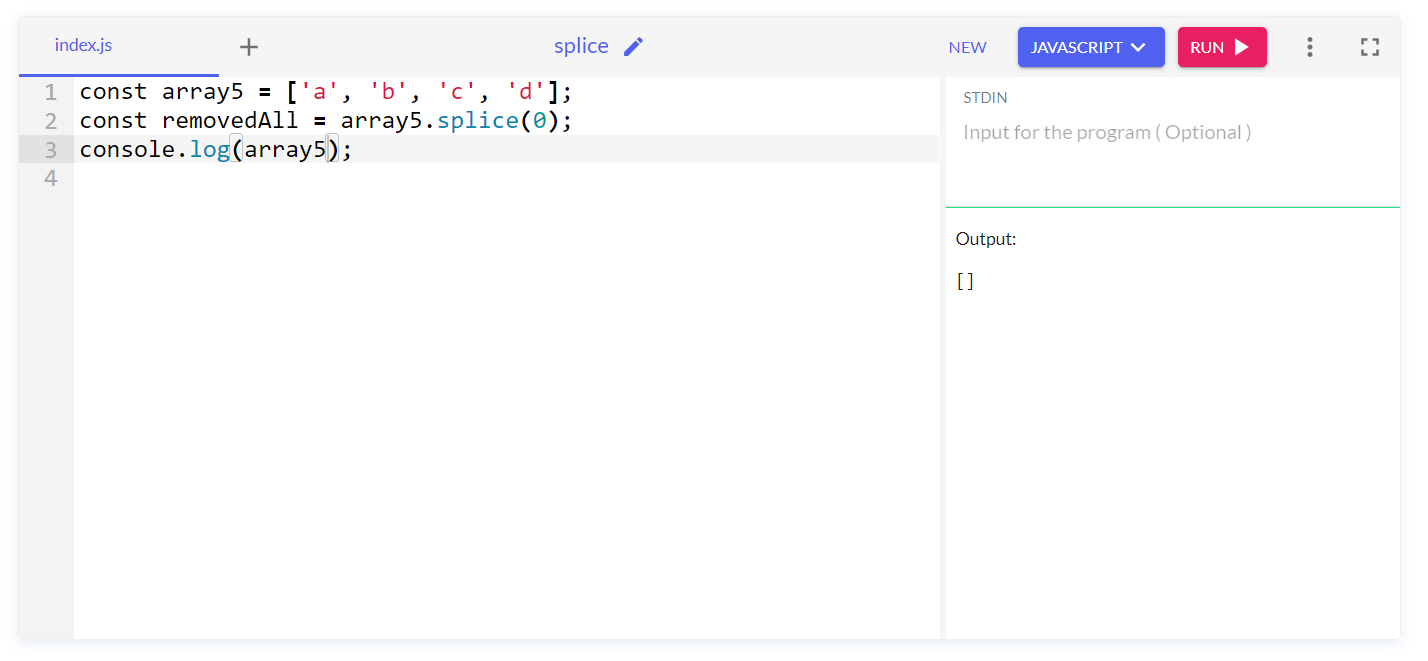
Result and Return Value of splice array in JavaScript
The splice() method in JavaScript is unique in that it directly modifies the original array on which it is called. When splice() is invoked, it alters the array by removing, replacing, or inserting elements at specified indices.
This means that any changes made by splice() directly affect the array on which it operates, rather than creating a new array or returning a modified copy. This mutative behavior allows for efficient in-place manipulation of arrays, saving memory and processing resources compared to creating new arrays.
As a result, developers can use splice() to modify arrays without needing to allocate additional memory or manage multiple array instances, making it a powerful tool for array manipulation in JavaScript applications.
Return value: array of removed items
When you use the splice() method in JavaScript, not only does it change the original array, but it also gives you back a separate array with the items that were removed during the process. This returned array consists of the elements that were deleted from the original array based on the specified parameters, such as the start index and the delete count.
For example, if you call splice() to remove three elements starting from index 2 in an array, the returned array will contain those three removed elements. This little feature lets you grab those removed items and use them elsewhere in your code, giving you more flexibility when playing around with arrays.
Conclusion: Let's learn how to use Negative Indices
To conclude this blog, let me tell you about another method that you can use in Splice() array in JavaScript.
Negative indices in JavaScript arrays allow you to access elements from the end of the array instead of the start. For example, -1 refers to the very last element, -2 to the second-to-last, and so on.
When you use negative indices with the splice() method, you can easily specify positions relative to the end of the array for adding, removing, or replacing elements.
This feature simplifies tasks like removing elements from the end or inserting elements before the last few elements which makes it easy to splice in array JavaScript.
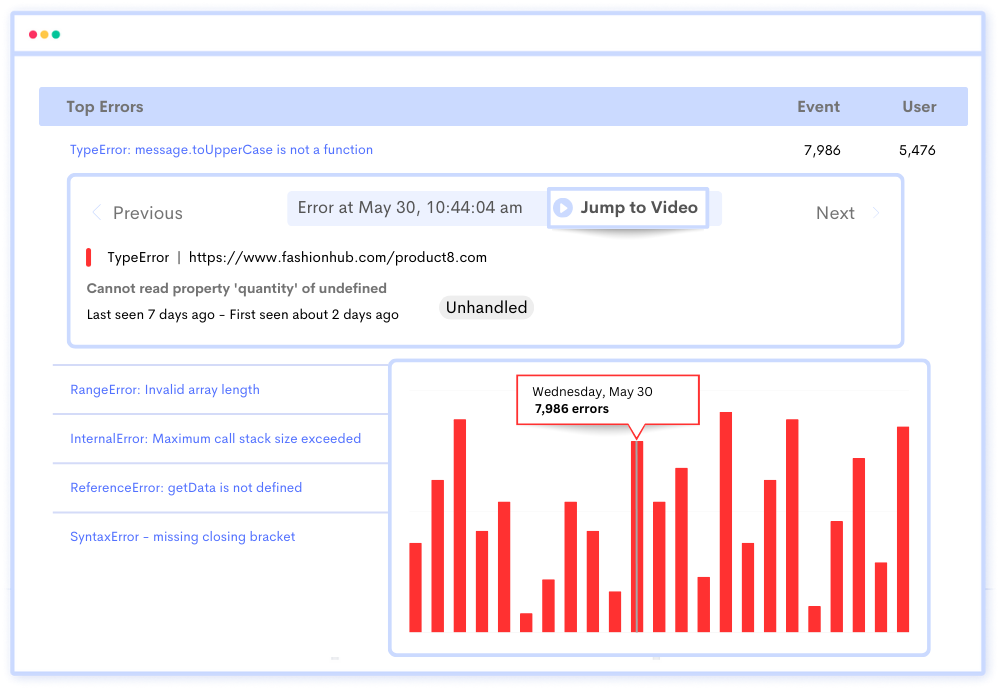
Debug Your JavaScript Errors in Minutes
ReplayBird, a digital user experience analytics platform designed specifically to track JavaScript errors to revolutionize the debugging process by providing comprehensive insights into application errors.
ReplayBird records a comprehensive data set, including console logs, stack traces, network activity, and custom logs. With ReplayBird, diagnosing JavaScript exceptions becomes seamless. You can replay sessions, facilitating rapid debugging and resolution.
One key feature of ReplayBird is its ability to record and replay user sessions, allowing developers to recreate the exact sequence of events leading up to an error. This enables thorough debugging and facilitates understanding of the root cause of issues.
Additionally, ReplayBird's real-time error replay functionality enables developers to see errors as they occur in the user's browser, streamlining the debugging process and accelerating time to resolution.
Overall, ReplayBird's JavaScript error tracking enhances the debugging experience by providing actionable insights and facilitating efficient error resolution, ultimately leading to more robust and reliable applications.
Try ReplayBird 14-days free trial
Read more on JavaScript
 Velantina
 Velantina
 Velantina