Routing is essential for React-based projects to ensure smooth app flow and interactions. If you’re working to create a react-based app, chances are you have already performed routing with one or more commonly used libraries.
Common routing libraries such as react-router and redux-tower can help you efficiently route your project modules with ease. However, if you’re a messy coder, then sustaining your routing blocks over the course of time can be a complex goal to achieve.
You need to update the routing on every version update to ensure secure transitions through different modules and easy scalability of your products.
Table of Contents
Isolated Routing with Next.js
Creating an isolated routing is one of the best strategies to ensure that your routing is manageable and easy to work around. Updating isolated routes is easier since it would not affect your complete codebase and would help you access faster updates.
Further, if you’re using Next for your routing process, you get the added advantage of accessing the file-system-based routing process. Hence, any file with the extensions.js, .tsx, .tsx, and .jsx under the pages directory is treated as a route.
With Next.js, you can perform both static and dynamic routing for your React projects effectively.
Top Routing Methods
Let us look into some of the common isolated routing methods that you can use with Next.js for an efficient routing process. Please note that although we’re using Next.js for the examples here, we can pretty much use this technique with any other routing libraries available out there. Moving forward, we will work with two major routing techniques, as follows:
Note: You can adapt to any of the routing methods from these as you see fit however, the final choice would eventually come down to your project size and its specific needs.
Method 1: Routing by creating a custom link component
To create a custom link component, you can use the next/router package to access the Next.js router and handle routing events. For example, you might create a CustomLink component that accepts a to prop and uses the Router.push method to navigate to the specified route when clicked.
Here is an example of a custom link component using next/router:
import { Router } from 'next/router';

const CustomLink = ({ to, children }) => (
  <button
    onClick={() => {
      Router.push(to);
    }}
  >
    {children}
  </button>
);
You can then use this CustomLink component in your app like any other link, passing the destination route as the prop:
import CustomLink from './CustomLink';

const App = () => (
  <div>
    <CustomLink to="/about">About</CustomLink>
  </div>
);
This approach allows you to create isolated link components that can be easily customized and reused throughout your app. It also gives you more control over the routing behavior of your app, allowing you to implement custom logic for handling route transitions.
Method 2: Segregation of all routing paths in a single file
Another common method of creating isolated routing would be to effectively segregate all your routing paths into a single file. Hardcoding all your routing paths in your project could cause code readability issues in the long run and disrupt your code structure.
Segregating your routing paths into a single file can help you make your code more reliable and scalable in the long run. For this, follow the step-by-step tutorial mentioned below with ease:
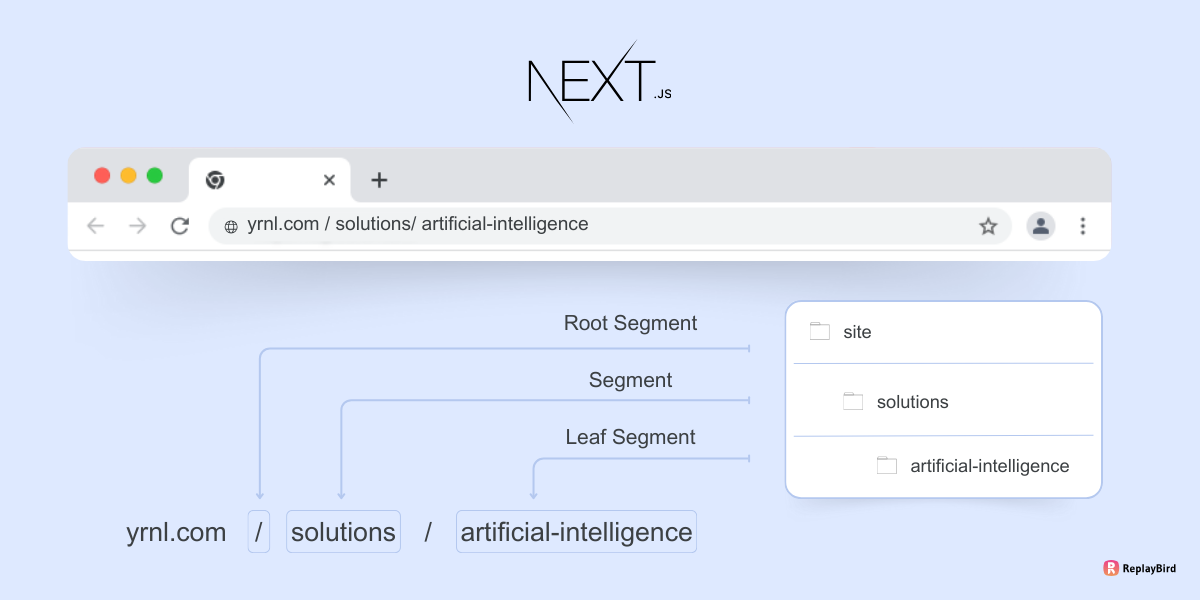
Step 1: Create a file name nextpath.ts that’s at the root of the project that would look like the following:
export default {
  solutions: '/solutions',
  artificialIntelligence: '/artificial-intelligence',
}
Step 2: Now you can import the routes to your projects similarly to the example below:
import paths from '~/nextpath;
<Link to={nextpath.solutions}>Solutions</Link>
<Link to={nextpath.artificial-intelligence}>Artificial Intelligence</Link>
How to handle Dynamic Routing process?
Before Next 9, the process of dynamic routing was not available for Next.js. However, after the release of version 9, developers can easily handle dynamic routing effectively by using Next.
For example, let’s say you need routing paths such as /services/3 since this would change according to the user’s input before Next.js’s version 9 you would individually have to redirect this path into /services?id=3.
To implement dynamic routing, we will use Link components and pass two holders, href that would link to the file in the pages folder and as would showcase how the URL would appear.
By doing so will help you create a reliable and scalable structure for the client-side router with ease.
Follow the following steps to implement effective dynamic routes:
Step 1: Add the functions in the paths folder to further return the props for the page:
export default {
    solutions : '/solutions',
    artificialIntelligence : '/artificial-intelligence',
    services(services: { id: string }) {
        return {
            href: '/services/[id],
            as: `/services/${id}`,
        };
    }
}
Step 2: Now, after the proper declaration, we will pass on the props as below to use them for routing purposes whenever we need them.
interface IProps extends React.AnchorHTMLAttributes<HTMLAnchorElement> {
  to: string | { href: string; as: string };
  prefetch?: boolean;
}

export default React.forwardRef(
  ({ to, prefetch, ...props }: IProps, ref: any) => {
    if (typeof to === "string") {
      return (
        <Link href={to} prefetch={prefetch || false}>
          <a {...props} ref={ref} />
        </Link>
      );
    }

    return (
      <Link href={to.href} as={to.as} prefetch={prefetch || false}>
        <a {...props} ref={ref} />
      </Link>
    );
  }
);
Step 3: Now our route would look something similar to the following whenever we are routing our different project modules.
<Link to={paths.services(services)}Services 1</Link>Note: Adapting to dynamic routing would make the routing process effortless and remove the chances of manual faults for developers, hence increasing the overall efficiency.
Wrapping up on Isolated Routing Methods
Handling the routing process in your project can be tiresome if you're still clinging to traditional modes. This is especially true if your chosen technology receives regular updates, as this would force users to prioritize consistent updates.
This, in the long run, would be both time- and energy-consuming for the developers and would increase the overall development and maintenance costs as well.
A rather smarter approach would be to isolate your routes, as we have discussed in the examples mentioned in this blog.
For this, you can either isolate using link components for both static and dynamic routes or you can segregate all your routes in a single file.
So, get started with the smart routing process today with the examples mentioned above for a stable and easy-to-manage development process.
Understand Exactly How Your Users Interact with Your Next.js app
ReplayBird, a digital user experience analytics platform designed specifically for Next.js developers with advanced insights to optimize your Next.js applications like a pro!
Unleash the power of behavioral insights with ReplayBird's intuitive heatmaps, session replays, and clickstream analysis allows you to visualize user behavior, identify popular elements, and detect pain points that might hinder user satisfaction.
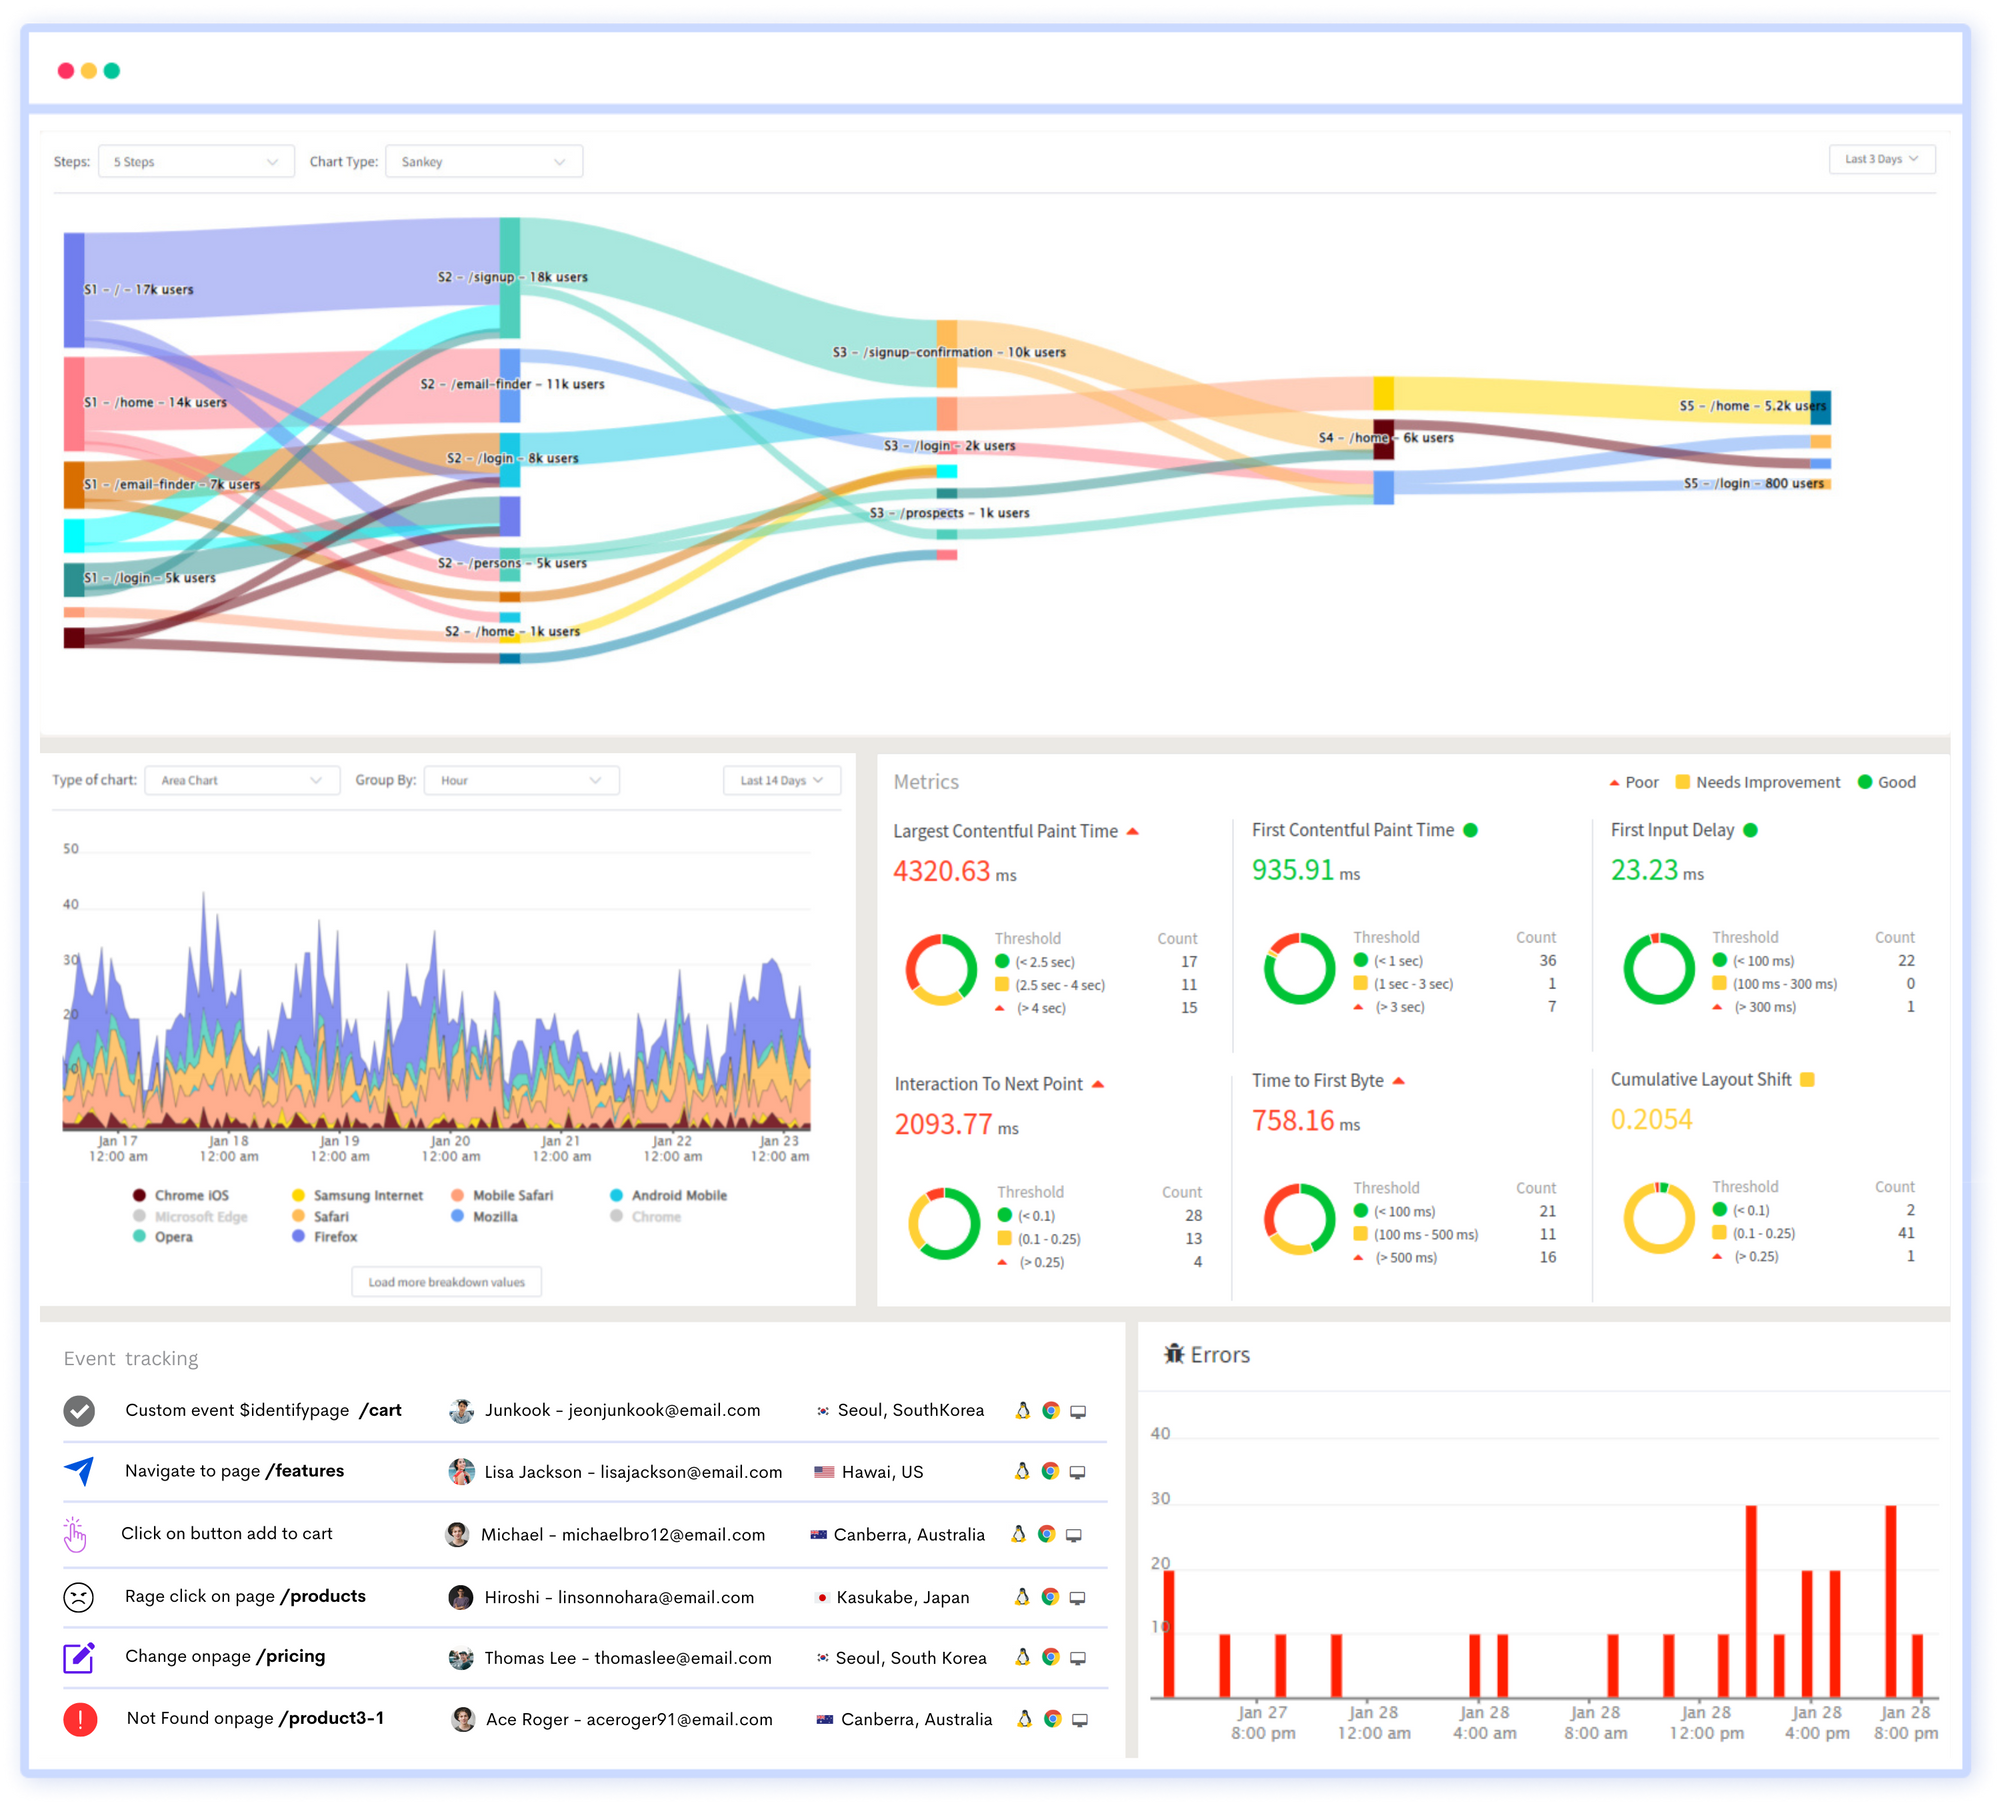
Customer journey analysis and conversion funnels of ReplayBird to analyze deeper into user journeys, identify where drop-offs occur, and uncover conversion blockers.
Troubleshooting is now simpler with ReplayBird's robust debugging features. Detect and diagnose UX issues quickly, ensuring a seamless user journey from start to finish.
With ReplayBird, you have the ultimate toolkit to elevate your Next.js projects to the next level. The platform empowers you to create high-performing, user-centric applications that leave a lasting impression.
Try ReplayBird 14-days free trial
Keep reading more about Next.js
 Velantina
 Velantina
 Uma
Uma Velantina