CSS Keyframe Animation - From subtle fades to dynamic transformations, CSS keyframe animation allows you to organize smooth and eye-catching effects that make your web projects stunning. The key is defining keyframes and letting CSS handle the rest.
Each keyframe acts as a snapshot of an element's style at a specific point in time, and CSS inserts the changes between them to create the illusion of motion.
Whether you're a seasoned web designer looking to enhance your CSS skills or a curious beginner eager to explore the of animations, this blog guides you everything about keyframe, and you can master the CSS animation.
- What are CSS keyframe animations?
- Animation Property
- Animation Property Shorthand
- How to Create Basic CSS Keyframe Animations
What are CSS Keyframe Animations?
CSS Keyframe Animations are robust technique in web development that lets developer or even CSS beginners to create amazing and eye-catching animations directly using CSS.
With CSS keyframe animations, you can define different stages of an animation, called keyframes, where you specify how an element should look at those points during the animation. This gives you total control over how the animation behaves, so you can create effects like smooth fades, seamless transitions, or fun rotations.
The best part is, you don't need to be a JavaScript operator! Keyframe animations are part of the CSS Animations module, which means you can create these animations using simple CSS code without getting into complicated JavaScript stuff. Moreover, they work great on most modern web browsers.
Let's look into the Syntax followed by the keyframe components:
Syntax
@keyframes animation-name {
  keyframe-selector {
    /* CSS styles for this keyframe */
  }
}
The 3 components of the CSS Keyframe Animations
- @keyframes Rule: The
@keyframesrule is used to define the animation's keyframes. It allows you to specify the intermediate styles that an element should have at different points during the animation. The @keyframes rule is followed by a custom name that you can later reference in the animation property. - Keyframe Selectors: The
keyframe-selectoris the Keyframe selectors of this syntax that are defined as percentages, representing the progress of the animation. You can create as many keyframes as you need to achieve the desired animation effect. For example, at 0%, you might define the starting state of the element, while at 100%, you'd define the final state. - Animation Properties: The
animation-namein the syntax is the animation property of this CSS that control the behavior of the animation, such as its duration, timing function, iteration count, direction, delay, and more. These properties are applied to the element using the animation property.
By combining keyframes and animation properties, you can bring your web pages to life with all sorts of engaging animations. Whether you want to add a touch of interactivity or simply make your site more visually appealing, CSS keyframe animations.
No wonder CSS keyframe animations are so popular among web designers and developers. They let you create delightful user experiences without relying on heavy JavaScript libraries or frameworks.
Animation Property
There are 8 animation properties that control over the behavior and appearance of CSS animations. You can use them to create captivating and dynamic animations. By fine-tuning these properties, you can animate a wide range of animation effects and interactions.
-
animation-name:
Think ofanimation-nameas giving your animation a special name tag. It helps you connect your animation with the set of keyframes (the specific animation steps) you want to use. You get to pick a fun name for your animation, like "bounce" or "spinIn," and then create the keyframes with the same name to match it. -
animation-duration:
Theanimation-durationproperty is all about setting the time for how long your animation party lasts. You get to decide how fast or slow your animation dances, making it last just a moment or going on for a longer groove. Adjust the duration in seconds or milliseconds to make your animation swift and snappy or smooth and graceful. -
animation-timing-function:
Imagine this as picking the perfect dance rhythm for your animation! Theanimation-timing-functionsets the beat, the pace, and the flow of your animation. There are exciting dance styles to choose from likelinear(constant speed),ease(smooth start and end), or even create your own dance moves withcubic-bezier. -
animation-delay:
Theanimation-delayis like saying, "Hey, let's start the animation party a little later!" It allows you to add a cool pause before the animation starts, giving it a bit of a dramatic entrance. Use seconds or milliseconds to control when the animation begins after the element appears on the screen. -
animation-iteration-count:
Theanimation-iteration-countlets you decide how many times your animation rocks the dance floor. You can set a specific number, like2or3, or make it party non-stop withinfinite. Adjust the count to make your animation show off its moves just a few times or keep going forever. -
animation-direction:
This property is all about giving your animation some direction! You can make it dance forward, backward, or even switch back and forth for some fun. Use values likenormal(forward),reverse(backward),alternate(forward-backward), oralternate-reverse(backward-forward). -
animation-fill-mode:
Think ofanimation-fill-modeas helping your animation dress up before and after the party. It decides how your element should look before the animation starts and after it ends. You can choosenone(default) to let it be its regular self, or dress it up withforwardsto keep the final pose orbackwardsto show the starting pose. -
animation-play-state:
This property gives you control over whether your animation is dancing or taking a break. It allows you to start or stop the animation whenever you want, either with JavaScript or CSS. Userunning(default) to make it dance orpausedto have it hold a pose mid-dance.
Now lets look into an example combining all 8 animation properties, but in this example it is okay if you dont understand the keyframe and other components, just concentrate on the 8 animation properties.
<div class="element"></div>/* Define the @keyframes rule for the elementspin animation */
@keyframes elementspin {
0% {
opacity: 0; /* Starting state: fully transparent */
transform: translateX(-100%); /* Starting state: element slides in from the left */
background-color: #F3EFE0; /* Starting state: background color is a pale yellow */
}
50% {
opacity: 1; /* Intermediate state: fully visible */
transform: translateX(50%) rotate(180deg); /* Intermediate state: element slides halfway and spins 180 degrees */
background-color: #222222; /* Intermediate state: background color changes to dark gray */
}
100% {
opacity: 0.8; /* Final state: slightly transparent */
transform: translateX(0) rotate(360deg); /* Final state: element slides back to its original position and spins a full 360 degrees */
background-color: #22A39F; /* Final state: background color changes to teal */
}
}
/* Apply the elementspin animation to elements with the class "elementspin" */
.element {
animation-name: elementspin;
animation-duration: 3s; /* Animation duration: 3 seconds */
animation-timing-function: ease-in-out; /* Animation timing function: starts slow, speeds up, and then slows down */
animation-delay: 1s; /* Animation delay: starts 1 second after the page loads */
animation-iteration-count: infinite; /* Animation iteration count: repeats 2 times */
animation-direction: reverse; /* Animation direction: plays the animation in reverse on every other iteration */
animation-fill-mode: forwards; /* Animation fill mode: retains the final state of the animation after it ends */
animation-play-state: running; /* Animation play state: set to running (default), could be set to paused */
width: 100px;
height: 100px;
padding: 20px;
}Output:
See the Pen Untitled by Velantina Vincent (@Velantina-Vincent) on CodePen.
Animation Property Shorthand
For the animation property, we can use shorthand to define various animation-related values in a compact format.
The syntax for the animation shorthand property is as follows:
animation: name duration timing-function delay iteration-count direction fill-mode;
animation: elementfade 2s ease 0.5s infinite alternate forwards;How to Create Basic CSS Keyframe Animations
We understood all we needed to know to create a basic CSS keyframe animations, now we will step by step create a CSS frame animation. With keyframe animations, you get to specify multiple points in your animation sequence. So, you define these special keyframes and set the properties of your element at each of those points.
These are the steps we are going to carry away to create the CSS keyframe animation:
- Step 1: Applying the Animation
- Step 2: Adding Delays and Repeating Animations
- Step 3: Easing Functions for Smoother Animations
- Step 4: Animation Direction and Fill Mode
- Step 5: Combining Animations
These steps will carry us by covering up the whole CSS keyframe animation to make our elements move and transform in a really engaging and eye-catching way!
Step 1: Applying the Animation
CSS has the "animation" property that lets you set the animation's name, duration, delay, iteration count, direction, fill mode, and timing function. Let's apply the elementfade animation to an element with the class animated-element.
To apply the elementfade animation to the element you want, simply add the animation property to the element's CSS styling to a <div> and give it that fade-in effect.
<div class="element"></div>@keyframes elementfade {
0% {
opacity: 0;
}
100% {
opacity: 1;
}
}
.element {
animation: elementfade;
animation-duration: 2s;
}Output:
Feel free to edit the CSS and run to check with your keyframe animation styling.
See the Pen Untitled by Velantina Vincent (@Velantina-Vincent) on CodePen.
In the CSS snippet above, we simply select the element with the class .animated-element and apply the elementfade animation using the animation-name property. The number 2s tells the animation to last for 2 seconds using the animation-duration property. Once your page loads, that element will smoothly fade in from being completely invisible (0% opacity) to fully visible (100% opacity) over those 2 seconds.
But remember to make the animation-duration a mandatory property as the duration will be 0 second by default, which leads to never loading animation.
Step 2: Adding Delays and Repeating Animations
Alright, now that we've got your animations applied to the HTML with 2 seond of duration, let's make the animation more better by adding some delays and repeating animations.
Adding Delays:
Delays are like the pause before the starting point or reveal. They give your animations a brief moment to gather anticipation before they start the animatipn. To add a delay to your animation, you can simply include it in the "animation" property.
.element {
	animation: elementfade;
	animation-duration: 2s;
	animation-delay: 1s;
}
In this example, we're telling our elementfade animation to wait for 1 second (1s) before it begins with giving the animation-delay: 1s;. So, when your page loads, there's a short suspenseful pause before the element starts its graceful entrance.
Repeating Animations:
Animations are cool, but imagine you have set your animatio duratio to 2 second, and user have to now sit and watch thew blank screen with ended animation, to move to next. That's where repeating animations come in! You can make your animations to repeat as many times you wanted or even loop infinitely to keep your visitors entertained.
.element {
	animation: elementfade;
	animation-duration: 2s;
	animation-delay: 1s;
	animation-iteration-count: infinite;
}
To our elementfade animation will have a 1-second delay before starting, and then it will keep looping infinitely with animation-iteration-count: infinite. You can modify the infinite to any number you want, for instance animation-iteration-count: 3 to make it repeat the animation 3 times.
Output:
Feel free to edit the CSS and run to check with your keyframe animation styling.
See the Pen Delays and Repeating by Velantina Vincent (@Velantina-Vincent) on CodePen.
Step 3: Easing Functions for Smoother Animations
By default, animations follow a linear progression, but we can make them even better. Imagine that! Easing functions control how your animation speeds up or slows down at different points, making it look more natural and pleasant.
To use an easing function, you just need to add it after the animation duration in the animation-timing-function property.
.element {
	animation: elementfade;
	animation-duration: 2s;
	animation-delay: 1s;
	animation-iteration-count: infinite;
	animation-timing-function: ease-in-out;
}
Here are a few common ones you might like:
ease: The default one, giving a gradual start and end with speed in the middle.ease-in: Starts slow and picks up speed as it goes.ease-out: Starts with a kick and gradually slows down.ease-in-out: Slow start, speedy middle, and gentle finish.linear: Keeps a steady pace all the way through.
Read More on CSS Transition Timing Function
Output:
Feel free to edit the CSS and run to check with your keyframe animation styling.
See the Pen Untitled by Velantina Vincent (@Velantina-Vincent) on CodePen.
Step 4: Animation Direction and Fill Mode
Animation Direction
By default, animations play smoothly from the beginning to the end, like following a straight path. animation-direction allows you to control the move your element from on direction to another and make it animate.
normal: This is the default setting. The animation plays from the beginning to the end and then again restarting from the beginning.reverse: With "reverse," your animation goes backward, starting from the end and gracefully moving back to the starting point.alternate: The "alternate" direction plays the animation forward, and then it smoothly reverses, creating a boomerang effect with back-and-forth movement.alternate-reverse: This one's a twist on "alternate." Your animation starts in reverse and then elegantly moves forward.
.element {
	animation: movedown;
	animation-duration: 2s;
	animation-delay: 1s;
	animation-iteration-count: infinite;
	animation-timing-function: ease-in-out;
	animation-direction: alternate;
}
Fill Mode
By default, once an animation completes, your elements go back to their original style. But we can make then animation last even after the animation finishes with the animation-fill-mode.
Here are the fill mode options:
none: This is the default behavior. Once the animation is done, the element goes back to its original style.
forwards: With "forwards," the element retains the styles applied at the last keyframe of the animation.
backwards: The element takes on the styles defined in the 0% keyframe even before the animation starts.
both: "Both" combines "forwards" and "backwards," making the element retain styles from both the start and end of the animation.
.element {
	animation: movedown;
	animation-duration: 2s;
	animation-fill-mode: both;
}
Output:
Feel free to edit the CSS and run to check with your keyframe animation styling.
See the Pen css-keyframe-animation-2 by Velantina Vincent (@Velantina-Vincent) on CodePen.
Step 5: Combining Animations
Now we can mix and match CSS keyframe animations to add complexity to our animation. Before we get into the action, ensure you have both animations defined in your CSS. For this example, let's use the elementfade animation for a smooth fade-in effect and the "slideFromLeft" animation to make elements gracefully slide in from the left side of the screen.
@keyframes elementfade {
  0% {
    opacity: 0;
  }
  100% {
    opacity: 1;
  }
}

@keyframes movedown {
  0% {
    transform: translateX(-100%);
  }
  100% {
    transform: translateX(0);
  }
}
To combine these animations, simply list both animation names and durations separated by commas in the "animation" property of your target element.
.element {
  animation: elementfade 1s, movedown 2s;
}
As a result of this combination, the element will appear with the smooth elementfade effect while simultaneously sliding in from the top to bottom using the movedown animation.
Output:
Feel free to edit the CSS and run to check with your keyframe animation styling.
See the Pen delete by Velantina Vincent (@Velantina-Vincent) on CodePen.
Conclusion:
Thoughtfully using CSS keyframe animations that increase user interactions and add visual interest can leave a lasting impression and set your website apart from the competition.
Less can often be more. Practicing restraint and using animations judiciously will ensure a refined and polished user experience, steering clear of overwhelming your visitors with excessive motion.
As you continue your CSS journey, explore and experiment with CSS keyframe animation, seeking ways to push the boundaries of your designs. Each project offers an opportunity to infuse creativity and innovation, showcasing your expertise in crafting delightful animations.
ReplayBird - Driving Revenue and Growth through Actionable Product Insights
ReplayBird is a digital experience analytics platform that offers a comprehensive real-time insights which goes beyond the limitations of traditional web analytics with features such as product analytics, session replay, error tracking, funnel, and path analysis.
With Replaybird, you can capture a complete picture of user behavior, understand their pain points, and improve the overall end-user experience. Session replay feature allows you to watch user sessions in real-time, so you can understand their actions, identify issues and quickly take corrective actions. Error analysis feature helps you identify and resolve javascript errors as they occur, minimizing the negative impact on user experience.
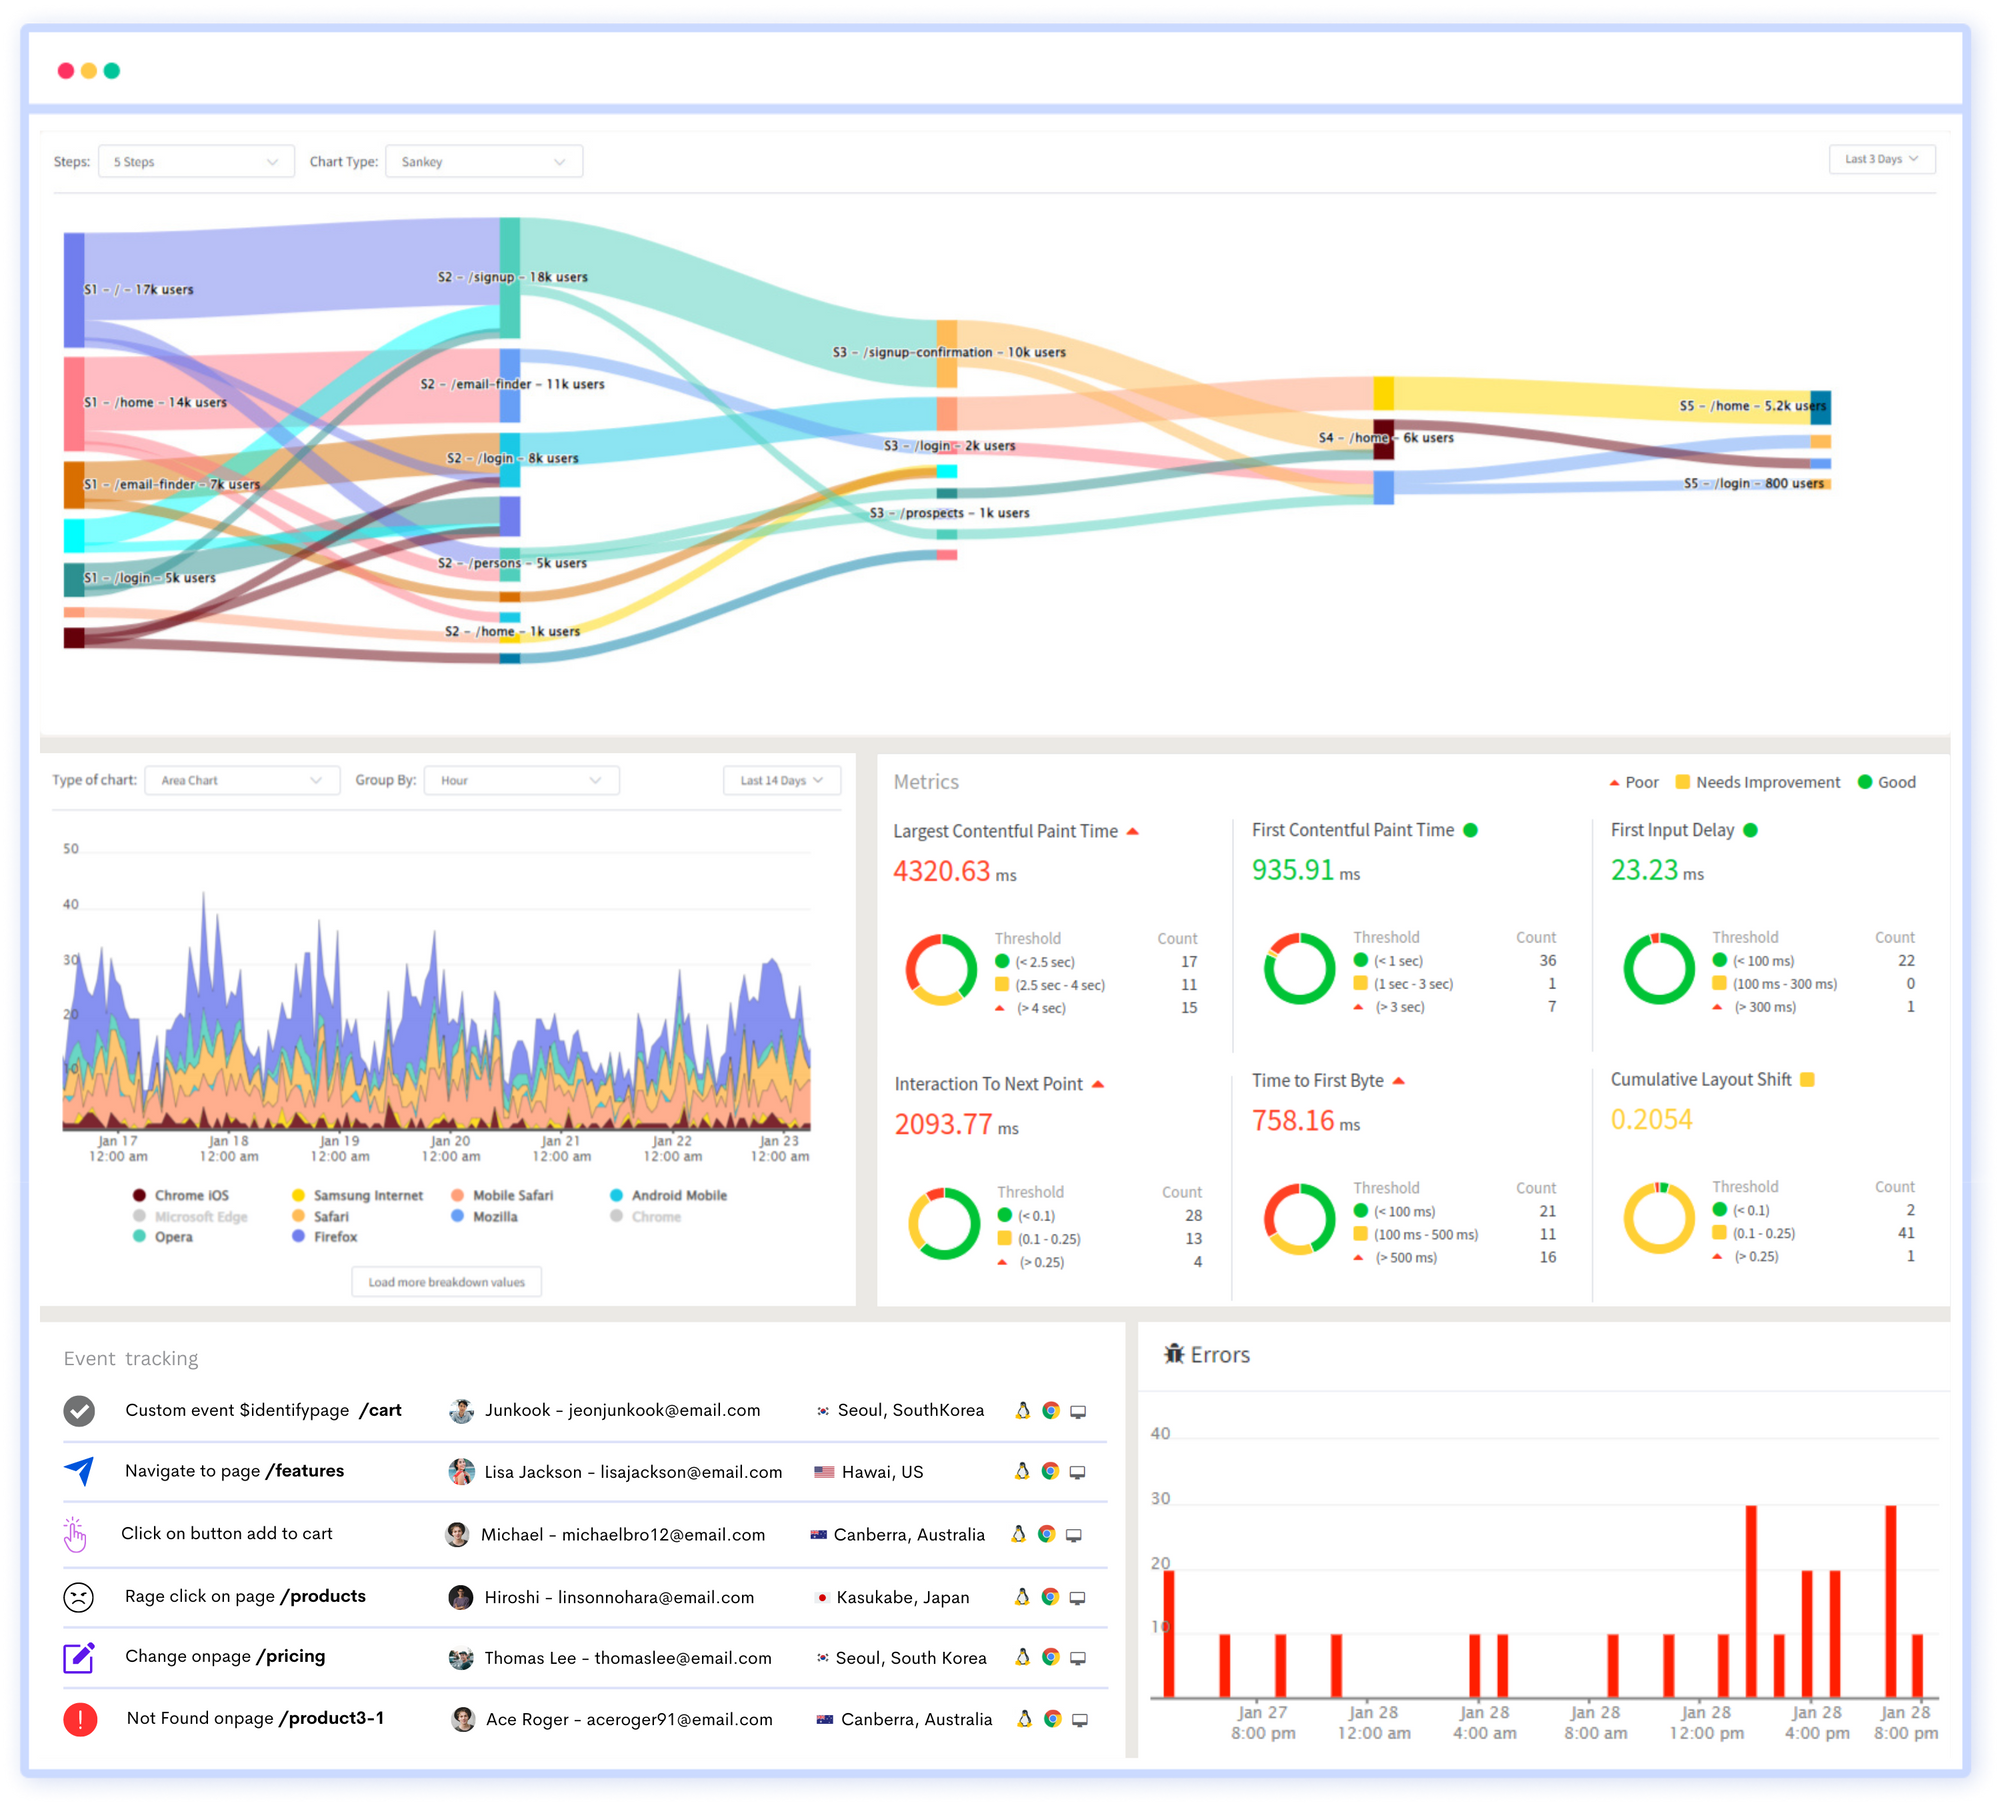
With product analytics feature, you can get deeper insights into how users are interacting with your product and identify opportunities to improve. Drive understanding, action, and trust, leading to improved customer experiences and driving business revenue growth.
Try ReplayBird 14-days free trial
Keep Reading about CSS
 VelantinaVelantina
 Velantina